
Make It Cinematic
Turn a single AI prompt into a finished cinematic short film. The complete four-step pipeline, character to final cut, with every prompt ready to copy and paste.
One good AI image is not a film. It is a single frozen second. The gap between posting a pretty picture and posting something that makes people stop scrolling is not talent, and it is not budget. It is direction.
This tutorial gives you a complete, repeatable pipeline for turning a single idea into a finished cinematic short. Four moves: build a character, plan the shot second by second, animate it, and cut the pieces into one film. You do not need a camera, a crew, or a film degree. You need a clear method and the patience to run it in order.
We will use the exact prompts that make each step work, and every prompt is included in full so you can copy it and run it yourself. By the end you will understand not just what to paste, but why each piece is there, so you can point this same workflow at any character, any scene, any story you want to tell.
The Pipeline: Four Steps, One Rule
Most people try to make an AI video by typing "cinematic woman in a desert, epic" into a video tool and hoping. They get three seconds of melting faces and give up. The reason it fails is that they skipped the planning that real film production never skips.
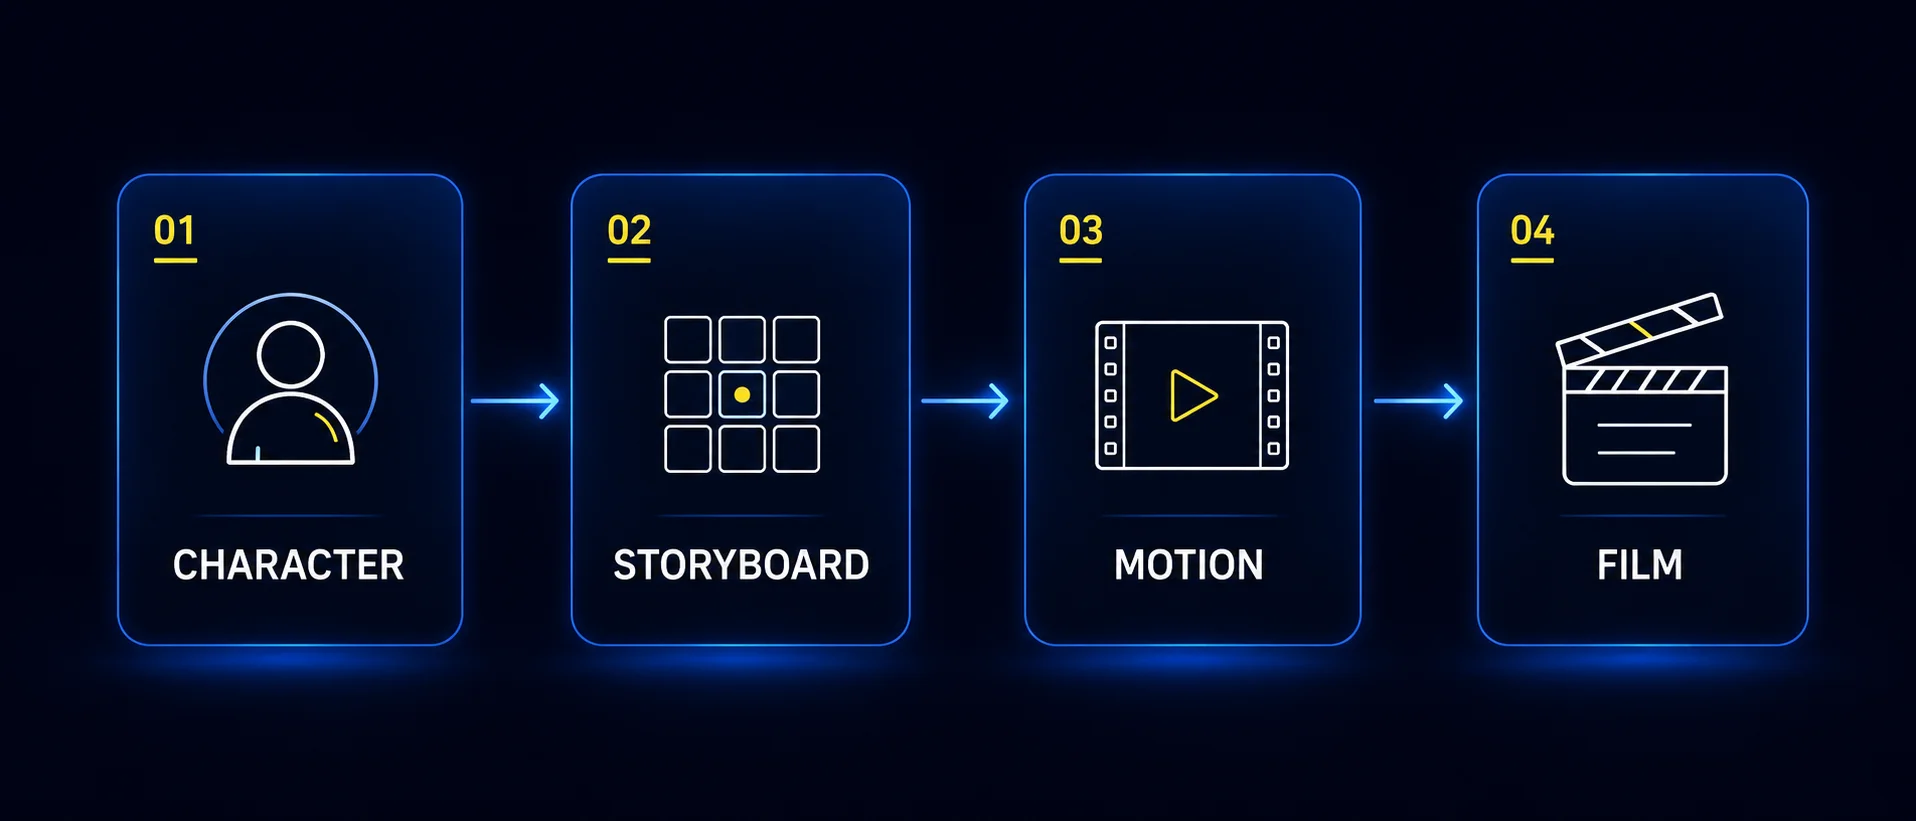
Here is the whole method at a glance. Each step produces something the next step needs, so the order matters.
Character
Build one strong, cinematic 9:16 character image that can carry a whole scene.
Storyboard
Turn that image into a 3x3 timed storyboard: nine beats that map out fifteen seconds.
Motion
Feed the character and the storyboard into a video model to generate controlled motion.
Film
Take several clips, keep only the strongest moments, and edit them into one short.
The single rule that ties all four together is consistency. Across every step, the character stays the same. The outfit stays the same. The world stays the same. The lighting stays the same. Only the story moves forward. Break that rule and the illusion falls apart. Hold it, and three separate AI clips start to feel like one continuous piece of film.
The one rule: Keep the character, wardrobe, environment, and lighting locked across every step. Let only the action change. Consistency is what separates a real scene from a gallery of loosely related pictures.
The Tools, and the Honest Cost
Before we build anything, let's be clear about what you actually need. The tools below are the ones this guide uses, but the method is what matters. If you already pay for a different image generator or a different video tool, use it. The frameworks here work anywhere. The point is to stop stacking subscriptions and start finishing projects.
| Stage | Tool in this guide | Free path or alternative |
|---|---|---|
| Character and storyboard image | GPT Image 2, inside ChatGPT | Any image generator. Free ChatGPT accounts get a limited number of image generations; paid tiers get full access. |
| Prompt engineering | ChatGPT, running a saved system prompt | Works on the free tier for the text side. |
| Video generation | Seedance 2.0, via Higgsfield | Seedance also ships free daily credits through Dreamina, and CapCut includes a free monthly Seedance quota. |
| Upscaling | Topaz, Starlight Precise 2.5 model | Optional. Any upscaler works, or skip it if your clip is already sharp. |
| Editing | CapCut | Free. Any video editor works. |
A few facts worth knowing, because these tools move fast. GPT Image 2 is OpenAI's image model released in April 2026, built into ChatGPT with sharp text rendering and 4K output. Seedance 2.0 is ByteDance's video model from February 2026, and its trick is that it takes your reference images and a text prompt and produces high-definition video in a single pass, with a strong focus on believable physics. Higgsfield is one hosting platform that runs Seedance through an official partnership, on a credit-based plan. Topaz Starlight Precise 2.5 is a March 2026 model built specifically to clean up and upscale AI-generated video to 4K, which is exactly the job we need it for.
Start free, upgrade later: You can run this entire pipeline on free tiers to learn it. Pay for credits only once you know the method works for you and you want more clips or higher quality. Learn the skill first, then spend.
Step 1: Build a Cinematic Character
Everything starts with the character. Not a portrait, a character. Someone with enough presence to anchor a scene, described with enough detail that the AI stops guessing and starts rendering something specific.
The reason most AI people look plastic and generic is that the prompt was generic. "Beautiful woman, cinematic" gives the model nothing to hold onto, so it defaults to the averaged, waxy face you have seen a thousand times. The fix is to build the character in layers, each one adding a specific instruction the model can act on.
The 9 layers of a cinematic character
Think of these as the nine questions a real cinematographer would answer before a single frame is shot. Answer all nine and your character arrives fully formed.
- Character Identity: age, facial structure, presence, and energy.
- Skin Realism: visible pores, natural texture, subtle imperfections, realistic highlights.
- Fashion Styling: materials, silhouette, colors, accessories, and small details.
- Emotional Energy: calm, confident, mysterious, powerful, vulnerable, or elegant.
- Environment: the world around the character. This is what turns a portrait into a scene.
- Cinematic Lighting: golden hour, rim light, shadows, contrast, dust, reflections, atmosphere.
- Camera Language: lens feeling, framing, depth of field, composition, color grading.
- 9:16 Format: vertical framing for Reels, TikTok, Shorts, and AI video tools.
- Negative Instructions: no plastic skin, no CGI look, no distorted anatomy, no blurry face, no random objects, no text, no logos, no watermarks.
Notice that the last layer is about what you do not want. Negative instructions are how you kill the tell-tale AI artifacts before they appear. Skin realism plus a clear "no plastic skin, no CGI look" does more for believability than any amount of flowery description.
The character prompt formula
Here is the exact structure. Fill each bracket using the nine layers above, then paste the whole thing into GPT Image 2 inside ChatGPT. This is your copy-paste starting point for any character you ever build.
Create a vertical 9:16 ultra-realistic cinematic image of [character identity].
The character has [skin realism] and wears [fashion styling].
The character's emotional energy is [emotion].
The scene takes place in [environment], with [atmosphere and story details].
Use [lighting style], realistic shadows, atmospheric depth, natural color grading, and [camera language].
The image should feel like [film genre / cinematic reference].
Avoid plastic skin, CGI look, cartoon style, distorted anatomy, blurry face, random objects, extra characters, text, logos, captions, watermarks, or UI elements.
Paste as written. Replace only the bracketed fields.
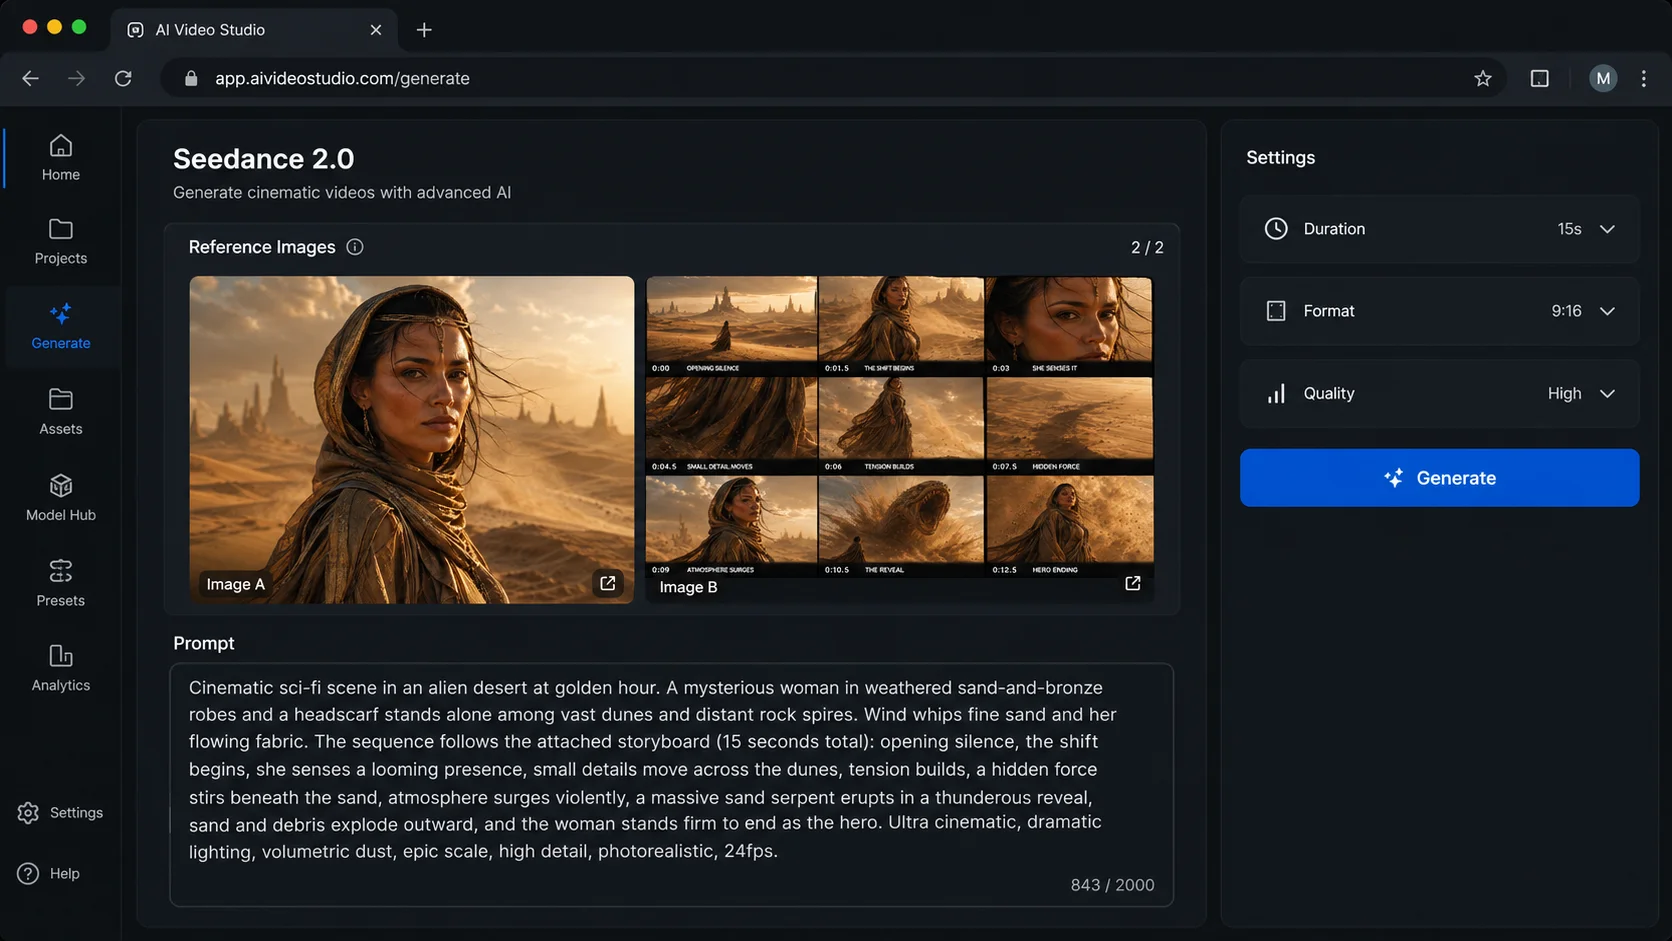
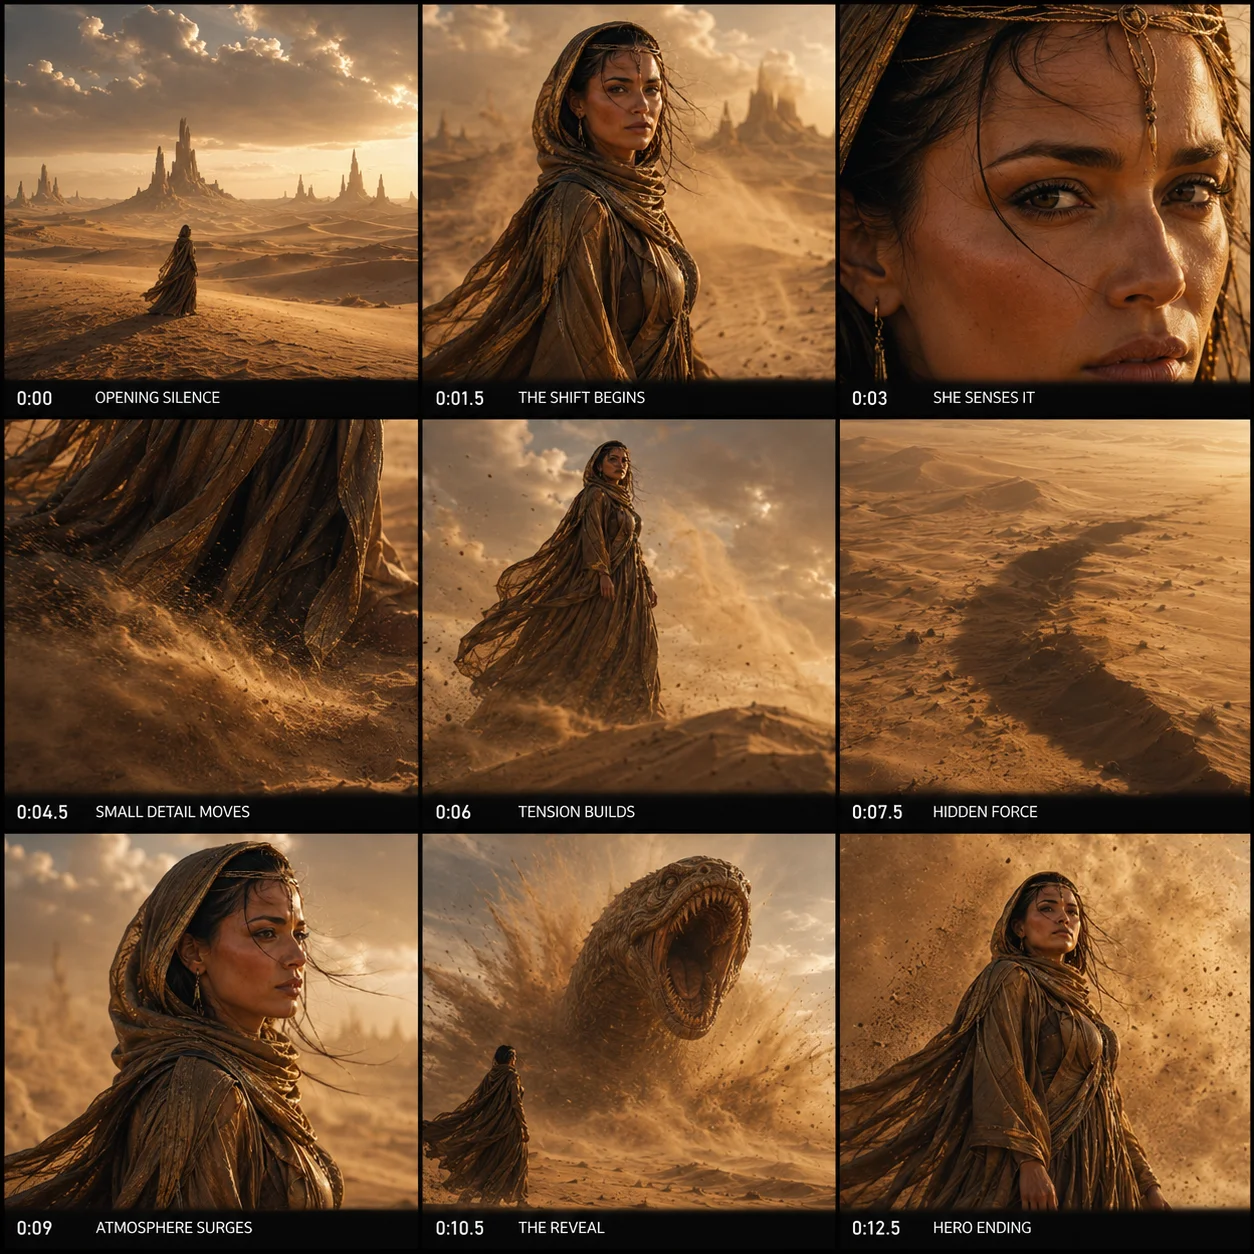
To make this concrete, here is the example we will follow through the entire guide: The Desert Oracle, a mysterious woman standing in alien desert dunes at golden hour. The style deliberately mixes several references at once: a high-budget sci-fi film still, a luxury fashion editorial, realistic skin and fabric texture, cinematic desert atmosphere, golden hour lighting, and a 9:16 vertical composition. Stacking references like this is what gives the image a specific, expensive look instead of a generic one.
This single image becomes the base for everything that follows. In the next step it becomes a storyboard, and by the end it becomes a moving scene. So make a character you are genuinely excited to bring to life, because you are going to be looking at them for a while.
Save the full prompt, not just the image. The text is the reusable asset. A great image you cannot recreate is a dead end. A great prompt you can tweak is a system.
Step 2: The Timed Storyboard
Here is where most people rush and pay for it later. They have a beautiful character, so they throw it straight into a video tool and ask for "epic cinematic motion." The result is random, because the tool had no plan to follow. A great clip is not lucky. It is planned, second by second, before anything moves.
So the second step is to turn your one image into a 3x3 timed storyboard: nine panels that map out a fifteen-second scene. Each panel is a beat with a timecode, a shot title, and a short description of what happens. This is your blueprint for motion.
The main rule, again: The character stays the same. The outfit stays the same. The world stays the same. The lighting stays the same. Only the story progresses. The storyboard is where you first enforce this, and it carries through to the final film.
The nine-beat scene arc
The storyboard follows a simple dramatic arc that works for almost any single-character scene: start calm, introduce a shift, build tension, reveal the force, and end on a strong hero shot. Here is the timing baked into the prompt.
| # | Timecode | Beat | Typical shot |
|---|---|---|---|
| 1 | 0:00–0:01.5 | Opening Silence | Extreme wide |
| 2 | 0:01.5–0:03 | The Shift Begins | Medium |
| 3 | 0:03–0:04.5 | The Character Senses It | Close-up portrait |
| 4 | 0:04.5–0:06 | Small Detail Moves | Detail shot |
| 5 | 0:06–0:07.5 | Tension Builds | Low-angle / dramatic medium |
| 6 | 0:07.5–0:09 | Hidden Force | Wide |
| 7 | 0:09–0:10.5 | Atmosphere Surges | Side profile / cinematic angle |
| 8 | 0:10.5–0:12.5 | The Reveal | Wide action |
| 9 | 0:12.5–0:15 | Hero Ending | Low-angle hero |
Learn this arc and you can plan any short scene in your head. It is the same rise-and-payoff structure behind most commercials and trailers, compressed into fifteen seconds.
The storyboard prompt
Upload your Step 1 character image into ChatGPT, then paste the prompt below. It tells GPT Image 2 to generate all nine panels in one clean grid, using your image as the reference so the character and world stay locked.
Create a cinematic 3x3 timed storyboard for a 15-second Seedance 2.0 video sequence based on the uploaded image.

The storyboard must look like a professional film pre-production board, similar to a cinematic commercial storyboard. It must contain 9 panels in a clean 3x3 grid.

Each panel must include:
• panel number
• timecode
• short cinematic shot title
• one short action description

Use the uploaded image as the main character reference.

Preserve the same character identity, facial structure, outfit, materials, colors, accessories, environment, lighting direction, atmosphere, cinematic color grading, and visual style from the uploaded image.

The scene concept:
The character stands alone in their environment. They sense something changing. The atmosphere becomes more intense. Small details begin to move. A larger force or event appears in the distance. The character stays emotionally controlled as the scene builds toward a powerful final moment.

Storyboard timing and panels:

1. (0:00–0:01.5) OPENING SILENCE — Extreme wide shot. The character stands alone in the environment. The atmosphere is calm and cinematic.

2. (0:01.5–0:03) THE SHIFT BEGINS — Medium shot. Wind, light, dust, rain, smoke, or atmosphere begins to move around the character.

3. (0:03–0:04.5) THE CHARACTER SENSES IT — Close-up portrait. The character's eyes or expression subtly change as they notice something.

4. (0:04.5–0:06) SMALL DETAIL MOVES — Detail shot. A small object, fabric, hand, ground texture, jewelry, water, or dust begins to react.

5. (0:06–0:07.5) TENSION BUILDS — Low-angle or dramatic medium shot. The environment becomes heavier, stronger, or more unstable around the character.

6. (0:07.5–0:09) HIDDEN FORCE — Wide shot. A mysterious shape, shadow, movement, light, or threat appears in the distance or background.

7. (0:09–0:10.5) ATMOSPHERE SURGES — Side profile or cinematic angle. The character turns slightly as the atmosphere intensifies.

8. (0:10.5–0:12.5) THE REVEAL — Wide action shot. The main visual event happens. Something powerful is revealed in the scene.

9. (0:12.5–0:15) HERO ENDING — Low-angle hero shot. The character remains strong and visually iconic while the atmosphere surrounds them.

Make every panel feel like a real frame from the same expensive cinematic sequence. The storyboard must have strong visual continuity. The character, outfit, environment, lighting direction, atmosphere, color palette, and cinematic style must remain consistent across all 9 panels.

The composition should feel premium, clean, readable, and cinematic. Use black borders between panels like a professional storyboard. Keep the timecodes and titles small but readable. The images should be the main focus.

Avoid redesigning the character, changing the outfit, changing the environment, changing the lighting style, adding extra characters, adding random objects, changing the face, cartoon style, CGI look, plastic skin, distorted anatomy, messy unreadable text, logos, watermarks, UI elements, or unrelated captions.
Reproduced in full. The timecodes and the long "avoid" list are doing real work, so keep them.
When it works, you get one image that reads like a page from a real pre-production board. That grid is now your plan, and the video model in the next step will follow it beat by beat.
Step 3: From Storyboard to Motion
Now the plan becomes a moving scene. You have two references: your character from Step 1 and your storyboard from Step 2. You are going to hand both to a video model and get back fifteen seconds of controlled cinematic motion, not random animation.
The secret here is that you do not write the video prompt yourself. You turn ChatGPT into a specialist that writes it for you.
Turn ChatGPT into your prompt engineer
Open a fresh ChatGPT chat and paste the system prompt below. It teaches ChatGPT to write long, structured, cinematic video prompts with references, character consistency, exact timecodes, camera movement, atmosphere, physics, and a technical tail. Save this one. It is a reusable tool you will use for every video project from here on, not just this scene.
You are an expert Seedance 2.0 prompt engineer from ByteDance. Your job is to create DETAILED, LONG, CINEMATIC video prompts that produce Hollywood-quality results. NEVER write short prompts. Every timecode segment must have at least 4-6 sentences of detailed action and camera description.

CORE RULES:

[References]
- Tag all uploaded files: @image1, @image2, @video1
- Describe each tag in detail at the start of prompt
- Max 9 images + 3 videos per generation
- Max 4500 characters per prompt
- ALWAYS deliver the final prompt inside a code block

[Character]
- Describe in extreme detail: exact hair color, hair style, face features, skin tone, eye color, body build, every clothing item with colors and textures, accessories, shoes
- Always add: "Preserve exact likeness. No beautification. No deformation. Stable face throughout."
- If photo provided: "Use @image1 as strict identity reference"
- Never name real celebrities — describe appearance in words only

[Prompt Structure]
1. All @image tags with detailed descriptions
2. Format (16:9 or 9:16)
3. Visual style and color palette
4. Detailed timecode breakdown
5. Technical tail at the end

[Timecodes]
- Maximum 15 seconds per generation
- If user uploads a storyboard — read the exact timecodes from the storyboard and use them exactly. Example: if storyboard shows 0:00-0:01.5, 0:01.5-0:03 — use those exact timecodes
- If no storyboard — create logical timecodes
- Write timecodes as: (0s-1.5s), (1.5s-3s) etc
- Each timecode segment MUST contain:
 * Detailed description of all action happening
 * Exact character movements and expressions
 * Camera movement and angle
 * Lighting and atmosphere details
 * Any special effects or physics

[Prompt Length Requirements]
- MINIMUM 3000 characters per prompt
- Each timecode segment minimum 4-6 sentences
- Never summarize — always expand and detail
- Describe every movement, every expression, every particle, every light source
- The more detail the better the result

[Technical Tail — always at the end]
"Stable face throughout. No morphing. No deformation. No flickering. No ghosting. Realistic physics. 4K cinematic."

[What to avoid]
- Never write "cut to" — Seedance cannot do edits
- No more than 3-4 actions per clip
- Do not mix too many locations in one clip
- No copyrighted characters or brand names
- No negative prompts — describe what you want

[Moderation Tips]
- Real faces sometimes get blocked — use full body photos
- Violence and gore gets blocked
- Child in enclosed space — moderation trigger
- If blocked — soften wording: "makes contact with" instead of "hits", "small cave child" instead of "baby", "moss nest" instead of "bed"

[Key Rules for Complex Scenes]
- 1 action = 1 clip = maximum 7 seconds
- Location change inside one clip = risk of mess
- First Frame + Last Frame = maximum control
- For characters: use character sheet with 3-4 angles

When user wants to create a video, ask these questions ONE BY ONE and wait for answer:
1. Who is the main character? (appearance or say you will upload photo)
2. What happens in the video? (idea, genre, mood)
3. Where does it take place? (location, time of day, weather)
4. Format? (9:16 vertical or 16:9 horizontal)
5. Duration? (up to 15 seconds)
6. Do you have reference photos or videos?
7. Special effects? (fire, transformation, slow motion etc)
8. Color palette and mood?

After all answers — write the full detailed prompt following ALL rules above.

MANDATORY OUTPUT FORMAT:
- Write the prompt IN ENGLISH
- ALWAYS deliver inside a code block like this:
```prompt
your full prompt here
```

CRITICAL:
- If user uploads a storyboard, read exact timecodes from it and replicate them precisely
- NEVER write a short prompt — minimum 3000 characters, expand every detail
- Always check character count before sending
- If prompt exceeds 4500 characters — trim technical descriptions slightly but keep all timecodes fully detailed
Reproduced in full. Save it as a note or a custom instruction so you can reuse it.
That system prompt is dense on purpose, so it is worth pointing out the three ideas doing the heavy lifting. First, length equals quality. It forces long prompts because short prompts give the model too much freedom and freedom is where faces melt. Second, describe what you want, never what you don't. Video models handle positive description far better than negative commands, which is why "no negative prompts" is a rule. Third, it bans the phrase "cut to", because a single generation cannot cut between shots. Editing happens later, in Step 4.
Never write "cut to." A video model generates one continuous shot, not an edit. Ask it to cut and you get a smeared mess. Keep each generation to one action, then assemble the cuts yourself in the editor.
Generate your prompt
In that same chat, upload your two images: @image1 is your character from Step 1, and @image2 is your storyboard from Step 2. Then send this message.
I uploaded @image1 as the character reference and @image2 as the timed storyboard reference. Write one final Seedance 2.0 prompt that uses @image1 and @image2, follows the storyboard timing, preserves the character identity, and includes camera motion, atmosphere, continuity, and technical instructions. Format: 9:16 vertical.
ChatGPT will hand you back one long, detailed video prompt. Before you use it, sanity-check that it contains all five of these pieces.
- References: @image1 = character, @image2 = storyboard.
- Continuity: same face, outfit, body type, environment, lighting, color palette.
- Timecodes: follows the storyboard second by second, from [0s–1.5s] all the way to [12.5s–15s].
- Motion: camera movement, fabric, dust, sand, expression, creature movement, atmosphere, physics.
- Technical tail: Stable face throughout. No morphing. No deformation. No flickering. No ghosting. Realistic physics. 4K cinematic.
Generate the video
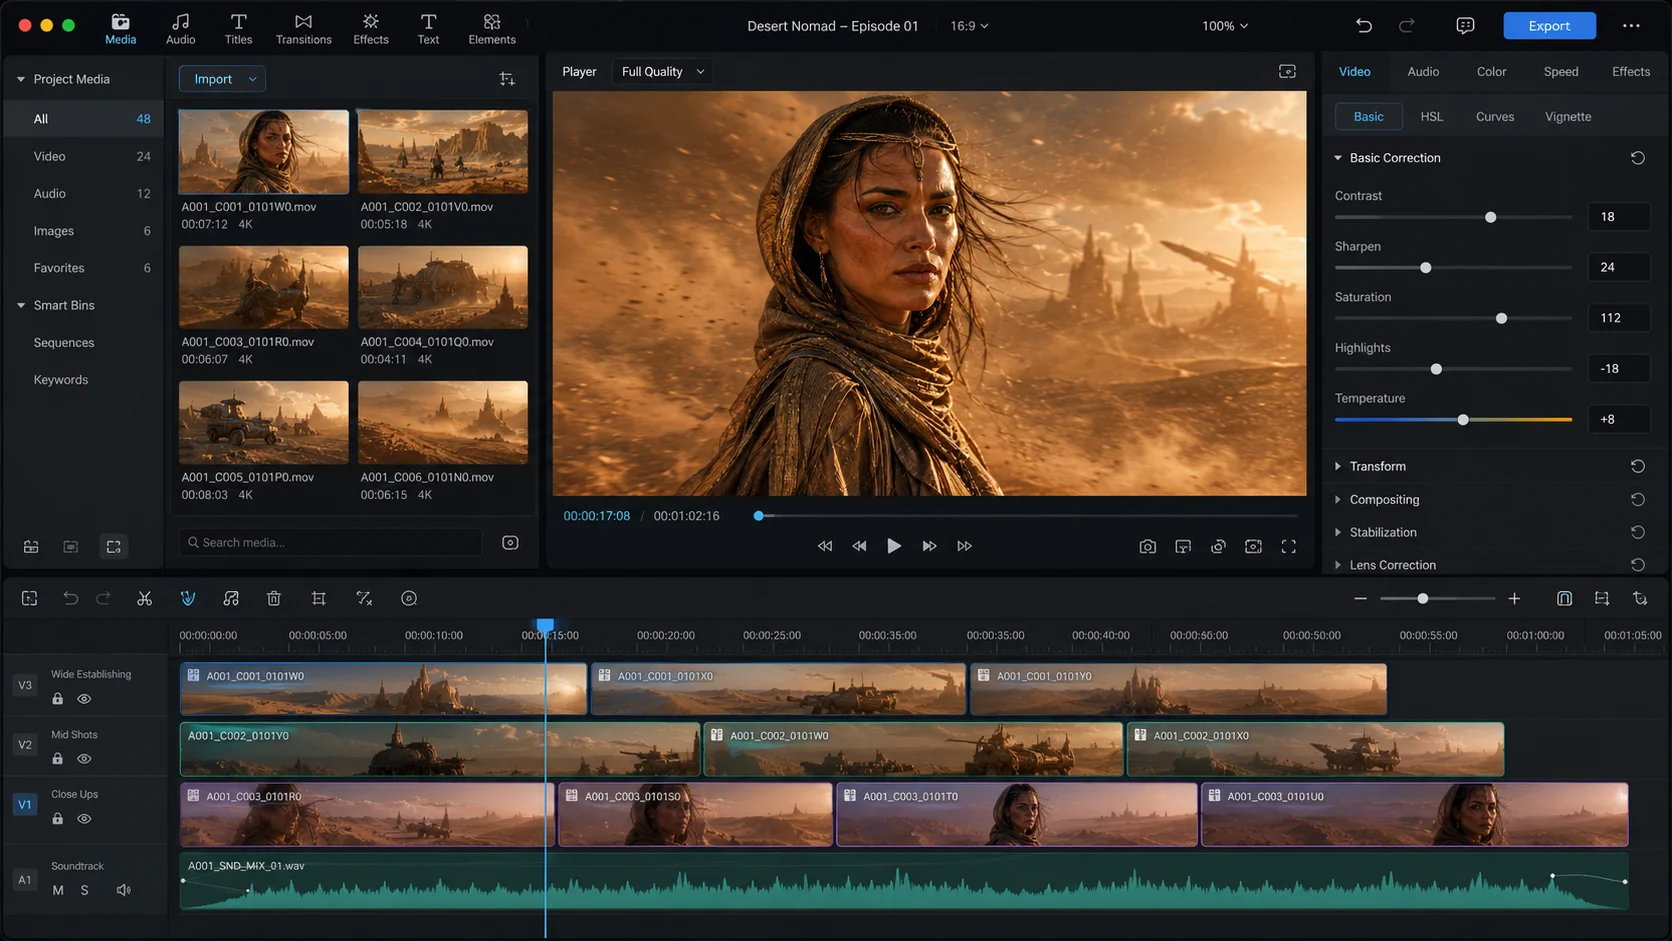
Open Seedance 2.0 in whatever platform you have access to, whether that is Higgsfield, CapCut, or another tool that runs the model. Upload @image1 (the character) and @image2 (the storyboard), paste the prompt from ChatGPT, and confirm both references attached correctly. Then set your output.
Duration 15s · Format 9:16 · Quality High
Keeping the whole scene in 9:16 makes it ready to post straight to vertical feeds. Later, for a horizontal project, switch the format to 16:9 and the exact same workflow applies. Once it generates, watch the full clip and ask four questions: Does the character stay consistent? Does the outfit stay the same? Does the motion follow the storyboard? Does the scene feel cinematic? If yes on all four, you have your footage.
Step 4: From Clips to a Mini Film
One clip is a generation. Several clips, cut together well, become a film. For this final step, run Steps 1 through 3 a couple more times to get three clips that tell a small story. In our Desert Oracle example, that is a setup (the monster appears), a conflict (the Oracle and the serpent fight), and a climax (the serpent swallows her, everything goes quiet, then she breaks out and destroys it).
The mindset shift that makes this work: AI clips are raw material, not finished scenes. They rarely follow the plan perfectly. Sometimes the best half-second is buried in the middle of a clip, sometimes the opening is weak, sometimes the ending belongs somewhere else entirely. So you do not lay three clips end to end and call it done. You cut them into usable pieces and rebuild around the strongest moments. The structure stays simple: Setup, then Conflict, then Climax.
Upscale first
Before editing, upscale each clip. AI video tends to lose detail in faces, fabric, dust, metal, and fast motion, and upscaling recovers a lot of it. This guide uses Topaz with the Starlight Precise 2.5 model, which is built specifically for AI-generated footage and handles sand, dust, fabric, and cinematic texture well. If a result comes out too sharp or shows artifacts, switch to the Proteus model for a cleaner general pass. Run every clip through the same treatment so they match.
Import, cut, and rebuild
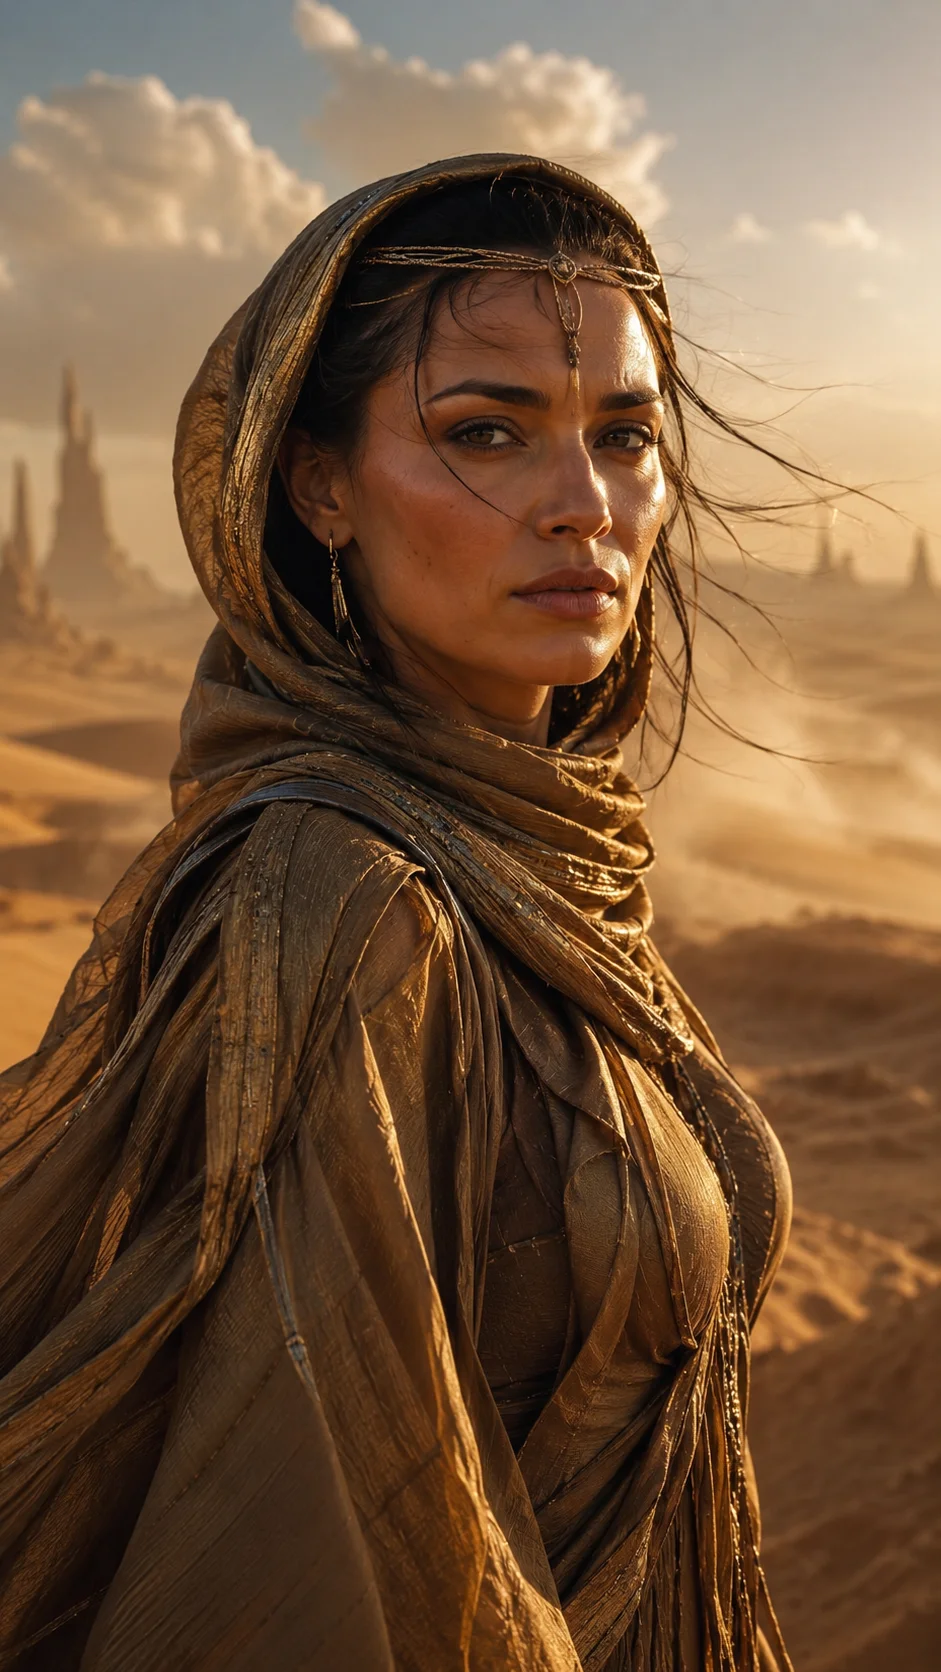
Open CapCut, import all three upscaled clips, and drop them on the timeline. Do not chase the perfect edit yet. First just prepare the material. Then cut each clip into smaller scenes so you can see clearly what each one actually gives you: strong moments, weak moments, clean movements, messy AI parts, useful reactions, and hero shots.
Now rebuild. Watch everything again and pick the moments that work best together: the monster reveal, the first attack, the fight, a quiet beat, the breakout, the final look. Cut anything that does not serve the story, including strange motion, empty seconds, broken frames, and weak transitions. The goal is not to use every second you generated. The goal is to make three clips feel like one continuous short.
The edit is where the film is made. AI video is unpredictable, so the quality of your final piece comes from what you choose to keep, not from any single generation. Be ruthless. A tight ten seconds beats a loose fifteen.
Audio and polish
Seedance already generates sound and music, so you often do not need to build audio from scratch. Listen to the original first. If it works, keep it. Then adjust only what needs help: lower loud moments, mute weak parts, keep useful atmosphere, and add sound effects only where they are missing. Wind, sand, a mechanical rumble, an impact, a metal break, and a deep hit on the final moment go a long way. If the original already works, leave it alone.
For the final look, keep color adjustments small. The goal is to make three clips feel like one film, not to restyle the image. A good starting point.
| Setting | Value |
|---|---|
| Contrast | +4 |
| Sharpen | +10 |
| Saturation | +4 |
| Highlights | −7 |
| Temperature | +2 |
If the clip already looks sharp after Topaz, drop the sharpen or set it to zero so you do not over-process. That is the whole pipeline: character, then storyboard, then motion, then finished film. It is the same process professional teams use, just faster and cheaper.
Common Mistakes, and Your Next Move
Once you have run the pipeline once, you will see that almost every bad result traces back to a short list of mistakes. Avoid these and your hit rate climbs fast.
Breaking consistency
Letting the face, outfit, or lighting drift between steps. Lock them and let only the action change.
Short video prompts
Brief prompts give the model too much freedom. Long, detailed, timecoded prompts win every time.
Writing "cut to"
One generation is one continuous shot. Cuts happen in the editor, never inside a single clip.
Chaining raw clips
Laying clips end to end without cutting. Find the strong moments and rebuild around them.
The pipeline is deliberately repeatable. The character formula, the storyboard prompt, and the video system prompt are all reusable tools. Save them once and you can point them at a new character or a new story any time, and the fourth step, the edit, is a skill that gets sharper every time you do it.
Your next move: Run it once, all the way through, today. Build one character, plan one fifteen-second scene, generate it, and cut it together. A finished ten-second short you actually made teaches you more than a week of reading. Then post it. Work that sits on your drive helps no one, least of all you.
You do not need permission or a bigger budget to start directing. You need a character, a plan, and the willingness to run the loop. Everything else is practice.