
Google AI Studio: A Beginner's Guide
Google AI Studio is Google's free workspace for building with Gemini: writing, images, video, and even working apps from a single sentence. This guide breaks down every part of it in plain English and walks you through building your first AI tool.
What Google AI Studio Actually Is
If you've used ChatGPT or the Gemini app, you already know what it feels like to chat with an AI. You type, it answers, and that's the whole experience. Google AI Studio is a different kind of tool. It's the workshop behind the chat window. It's where you stop just talking to AI and start building things with it.
Here's the simplest way to think about it. Google has a family of AI models called Gemini. The Gemini app at gemini.google.com is the friendly front door, made for everyday conversations. Google AI Studio is the builder's door to the exact same models, except now you get the dials, the controls, and the ability to turn what you make into a real tool, image, video, or app you can share with the world.
And the best part for anyone watching their budget? The Google AI Studio interface is free. No subscription, no credit card, no trial timer counting down. You sign in with a regular Google account and you're in. You only ever pay if you build something that gets heavy usage and you choose to scale it past the generous free limits, and we'll cover exactly when that happens later in this guide.
The one-line version: The Gemini app is for using AI. Google AI Studio is for building with it. Same brain, more control, still free.
For a solopreneur, freelancer, or student, this matters more than it might sound. Most people pay for three or four separate AI subscriptions: one for writing, one for images, maybe one for video. AI Studio puts all of those capabilities in a single window, for free, and adds the ability to build custom tools on top. That's a real edge when you're funding your work out of your own pocket.
Getting In and Finding Your Way Around
Getting started takes about thirty seconds. Go to aistudio.google.com, click sign in, and use any Google account. That's it. There's no setup wizard and nothing to install. The whole thing runs in your browser.
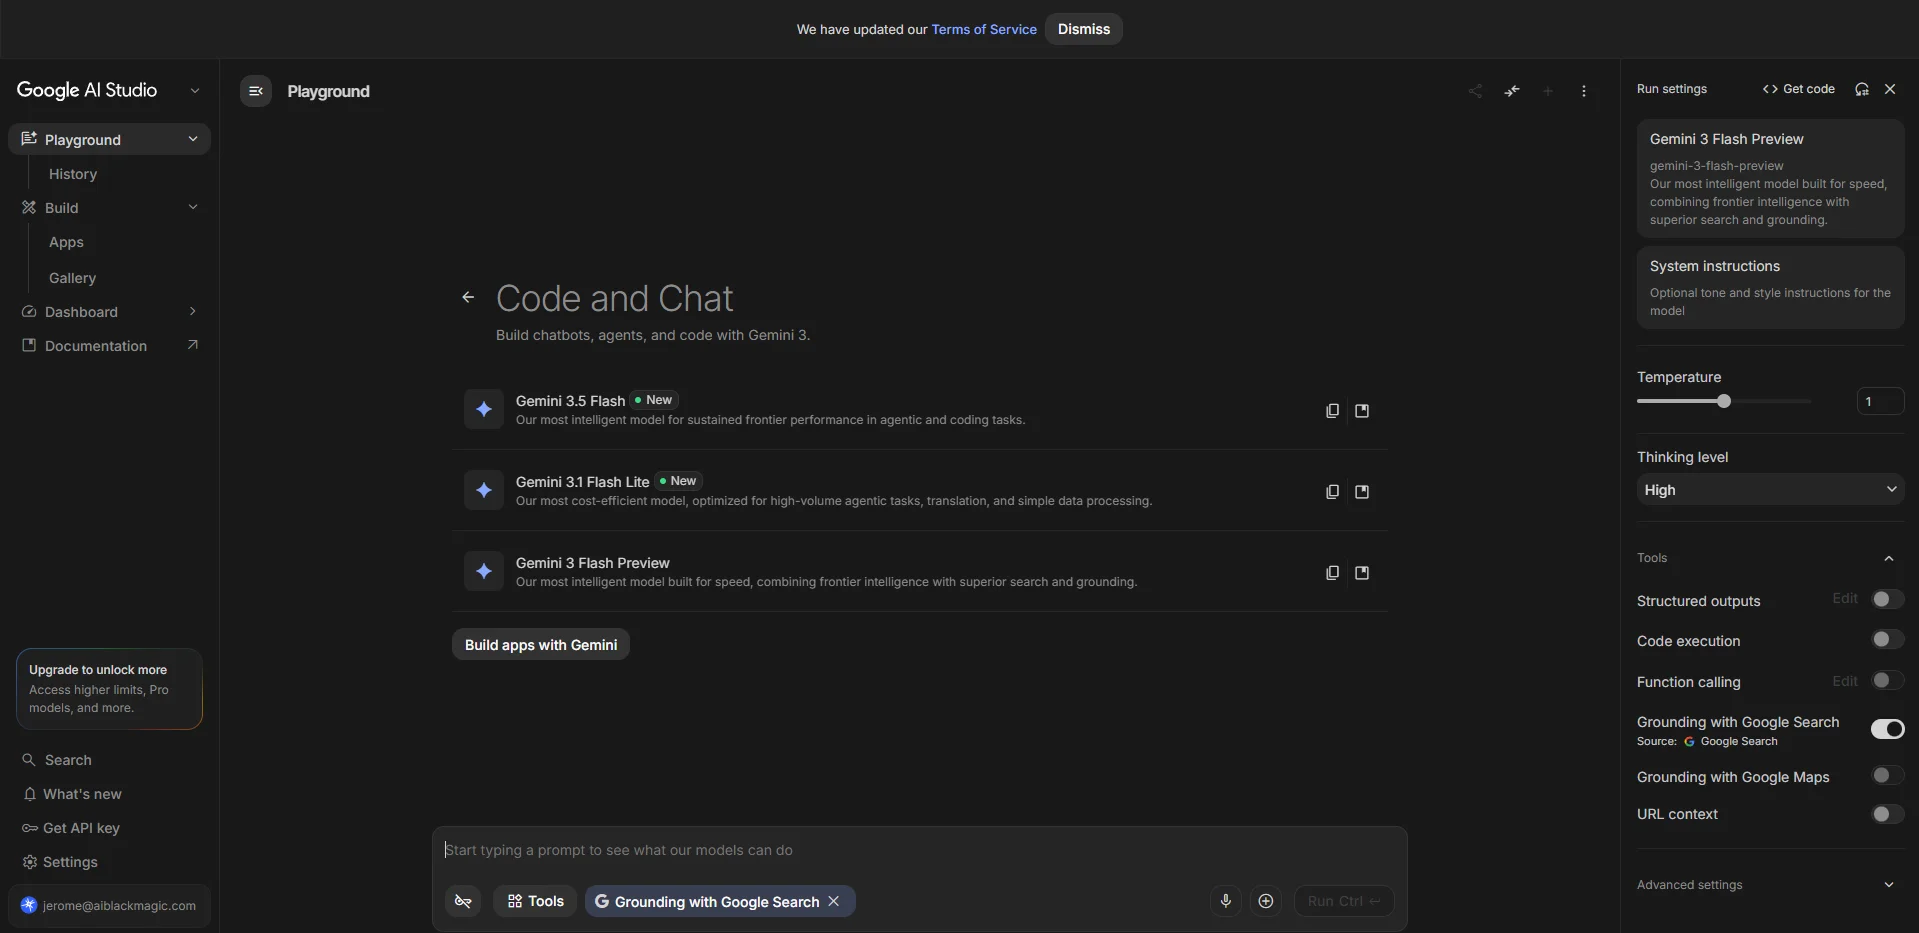
When you land, you'll see a layout with a navigation rail down the left side and your main work area in the middle. Don't let the number of options intimidate you. You'll spend almost all your time in just two of them. Let's walk through what each part does so the screen stops feeling like a cockpit.
The left sidebar, decoded
Playground
Your testing lab. This is where you type prompts, pick a model, and see what comes out. Most beginners live here.
History
Every session you run gets saved here, so you can reopen something from last week and keep going.
Build (Apps and Gallery)
The app builder. Describe an app in plain English and it gets made. The Gallery holds example apps you can copy.
Dashboard
Your control panel for usage, limits, and billing status. Check here if you ever want to see what you've used.
Get API key
A single click creates the key your finished apps use to keep talking to Gemini. You won't need this on day one.
Settings
Account, theme, and a place to safely store passwords and keys your apps might need. Visit it later, not now.
There's also a "What's new" link worth a mention. Google ships changes to this tool almost every week, so the buttons may shift slightly over time. If something in this guide looks a little different on your screen, that's why. The core ideas stay the same even when the paint moves around.
The Playground: Your Testing Lab
The Playground is the heart of Google AI Studio, and it's where you should start. At its simplest, it works exactly like a chat: there's a box at the bottom, you type a prompt, you hit Run, and you get an answer. You could use it like a free version of ChatGPT and walk away happy.
But that would be like buying a full kitchen and only ever using the microwave. The Playground gives you something the consumer chat apps hide: control over how the AI thinks before it answers. Those controls live in the panel on the right side of the screen, labeled "Run settings." We'll get to those in the next section.
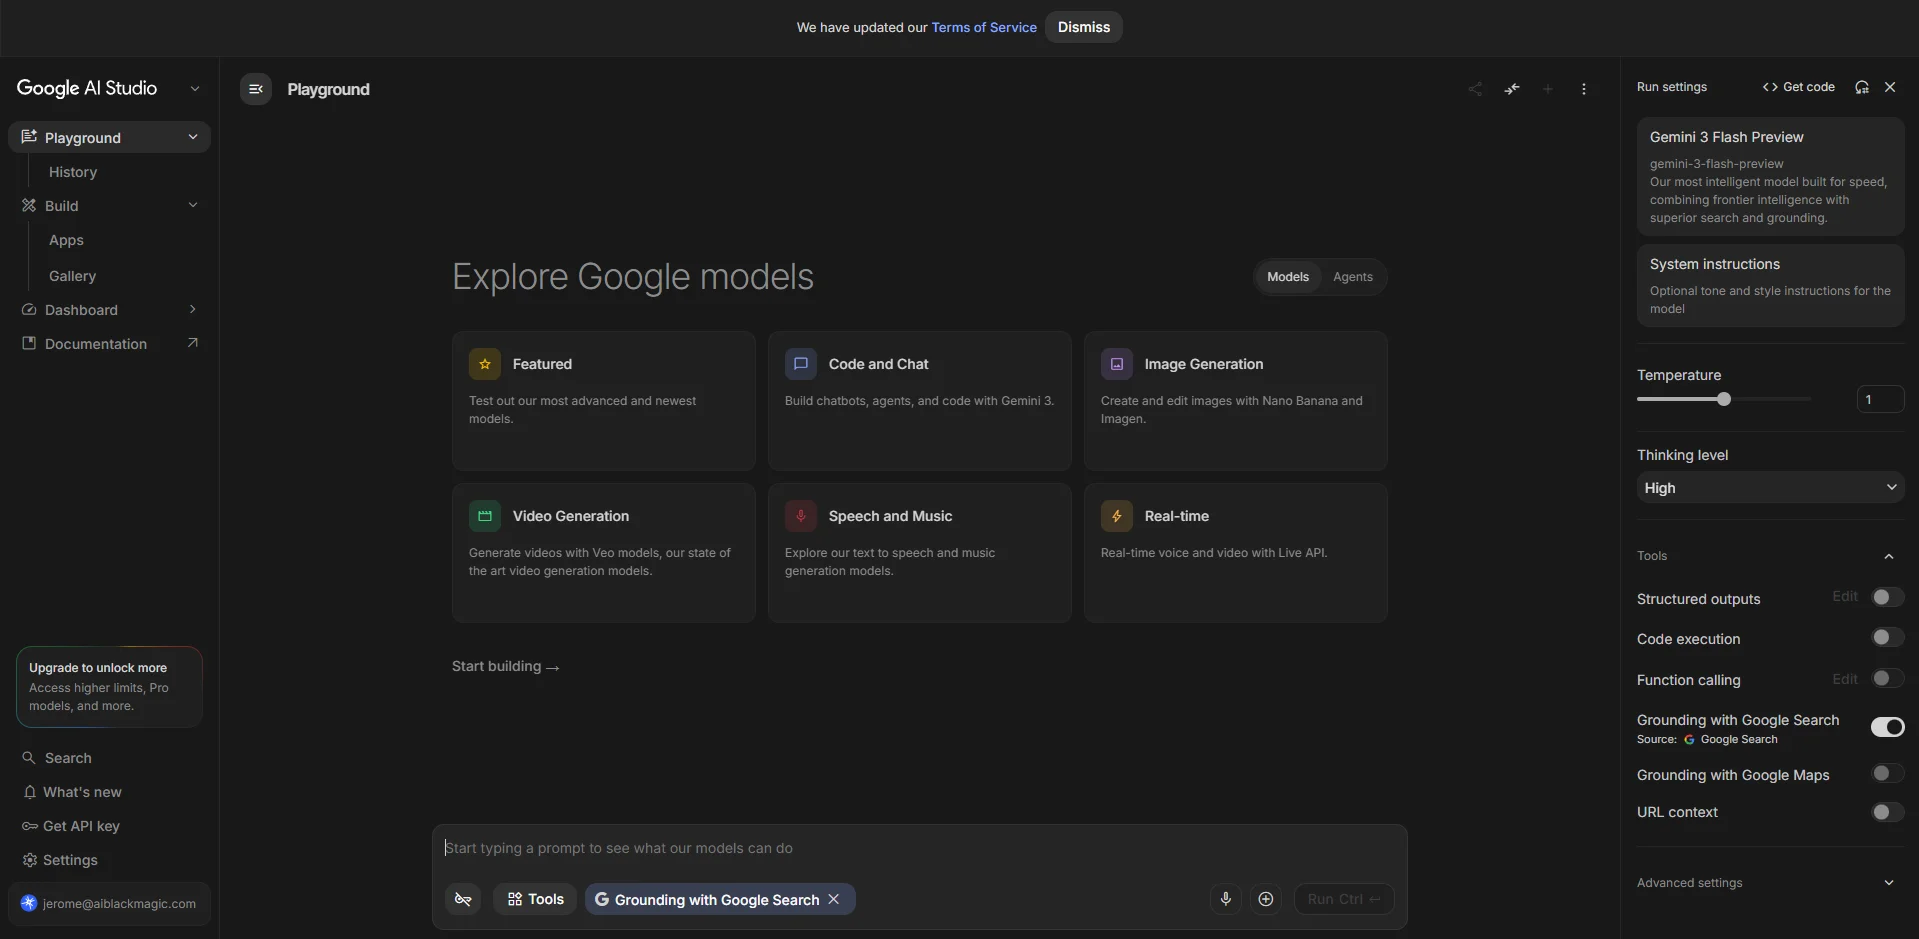
One thing to notice at the top of the Playground is a small toggle between Models and Agents. For now, stay on Models. That's the standard "ask a question, get an answer" mode. Agents is a more advanced area where the AI can work on a task by itself over several steps, and it's worth exploring once you're comfortable, but it isn't where beginners should start.
Best practice: Before you type anything serious, glance at the top of the right panel to see which model is selected. Gemini 3.5 Flash is the default and the right choice for almost everything. It's fast, smart, and free to use.
The Settings Panel That Gives You Real Control
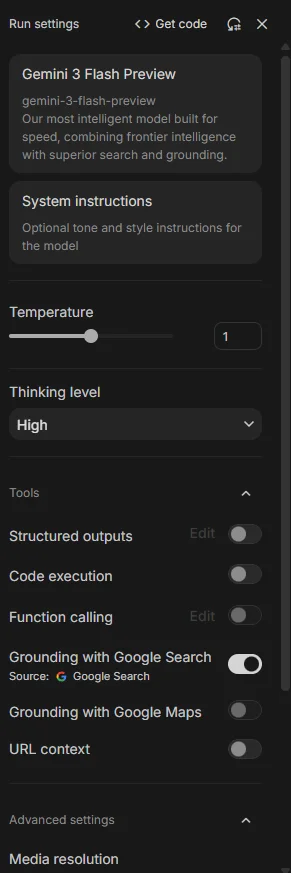
This is the part that separates people who get average results from people who get great ones. The "Run settings" panel on the right looks technical, but you only need to understand five things. Once these click, you'll feel like you have a steering wheel instead of a magic eight ball.
System instructions
This is the single most useful box in the whole tool, and most beginners never touch it. System instructions are standing orders that apply to every message in your session. Think of it as hiring an assistant and handing them a job description before they start.
Instead of repeating "write in a warm, casual tone for small business owners" in every prompt, you write it once in system instructions and it sticks. This is how you bake your own brand voice into the AI. We'll use this in the hands-on project later, and it's genuinely the skill that pays off the most.
Temperature
Temperature is the creativity dial, and it runs from 0 to 2. Low temperature, around 0.2, makes the AI focused and predictable. Use it for facts, summaries, data, and anything where you want the same reliable answer every time. High temperature, around 0.9 or above, makes it loose and inventive. Use it for brainstorming, names, taglines, and creative writing. The default of 1 is a fine middle ground while you find your feet.
Thinking level
Newer Gemini models can spend extra effort reasoning before they answer. Thinking level lets you choose Low, Medium, or High. Low is fast and fine for simple tasks. High makes the model slower but noticeably sharper on hard problems like logic, math, and complicated planning. If an answer feels shallow, bump this up and run it again.
Tools
This is where the Playground stops being a chatbot and becomes something more capable. Each tool is a simple toggle you flip on or off.
Grounding with Google Search
Connects the AI to live Google Search so answers reflect current reality and come with sources. Turn this on for anything recent or factual.
URL context
Paste in a web address and the AI reads that page as source material. Perfect for "summarize this article" tasks.
Code execution
The AI writes and runs real code to calculate answers or build charts, instead of guessing at math.
Structured outputs
Forces the answer into clean, organized data instead of loose paragraphs. Handy when feeding results into a spreadsheet.
Worth knowing: Turning on "Grounding with Google Search" is the easiest way to cut down on the AI making things up. If accuracy matters for your task, flip it on before you run anything.
There are two more tools you'll see, "Grounding with Google Maps" for location data and "Function calling" for connecting to other software, plus an "Advanced settings" section with finer dials like Top-P and output length. You can safely ignore those until you have a specific reason to need them. Don't let the extra switches slow you down.
What You Can Actually Make
Here's where AI Studio earns its keep. It isn't just for text. The same free login gives you access to Google's full lineup of models for words, images, video, voice, and music. This is the part that replaces a stack of paid subscriptions.
You don't pick raw model names from a confusing list. The home screen groups everything into plain categories: Code and Chat, Image Generation, Video Generation, Speech and Music, and Real-time. Pick the category that matches what you want to make, and the right model is already chosen for you.
| What you want | The model behind it | Good for |
|---|---|---|
| Text and chat | Gemini 3.5 Flash | Writing, planning, answering, summarizing. Your everyday workhorse. |
| Harder thinking | Gemini 3.1 Pro | Complex analysis, tricky logic, detailed strategy. Slower but deeper. |
| Images | Nano Banana | Graphics, product shots, ad creative, and images with real readable text. |
| Video | Veo | Short cinematic clips with sound and dialogue generated together. |
| Voice and music | Gemini TTS and Lyria | Natural narration and original background music or full songs. |
| Live conversation | Gemini Flash Live | Real-time voice apps you can talk to and that talk back. |
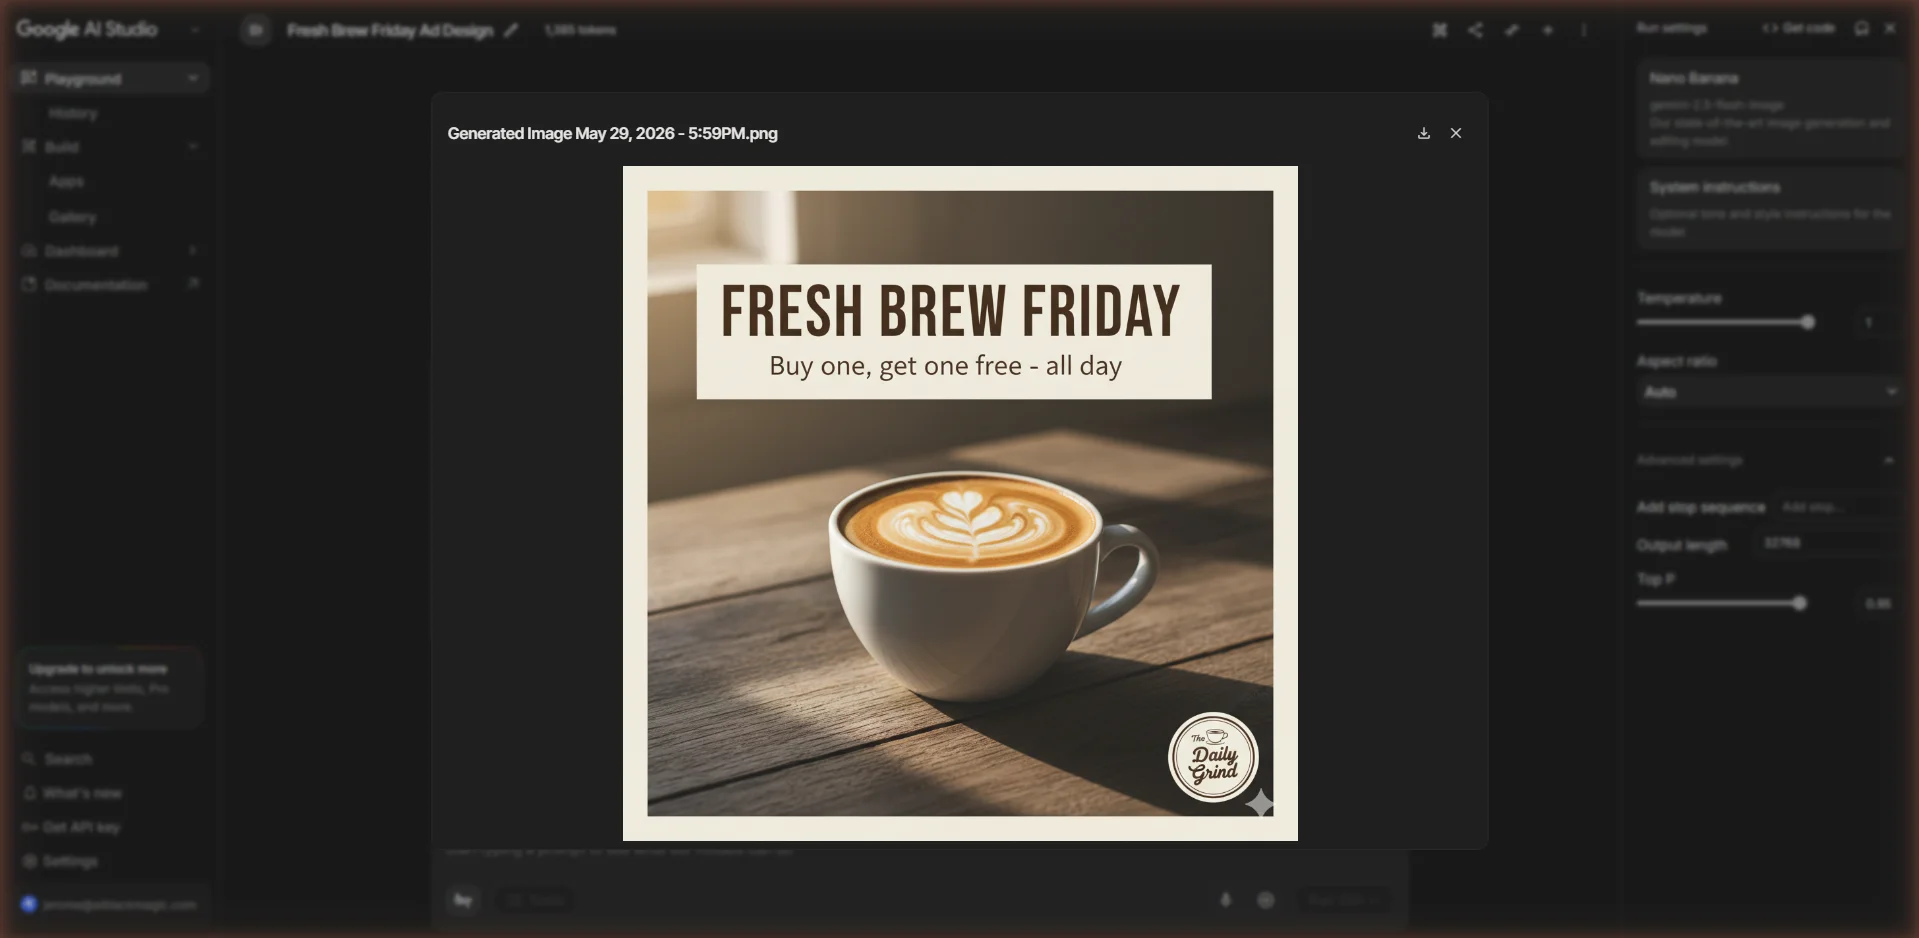
A quick word on the funny name. "Nano Banana" really is what Google calls its image models, and they're some of the best in the business right now. The standout feature is that they can put accurate, readable text inside an image. If you've ever tried to make a poster or ad graphic with another AI and ended up with garbled nonsense letters, you know how rare and useful that is. For anyone making social posts, thumbnails, or ads, this alone is worth the visit.
Power tip: Veo, the video model, generates the sound at the same time as the picture. That means footfalls, voices, and ambient noise line up with the visuals automatically, which most video tools still can't do well.
Build Mode: Turn an Idea Into a Working App
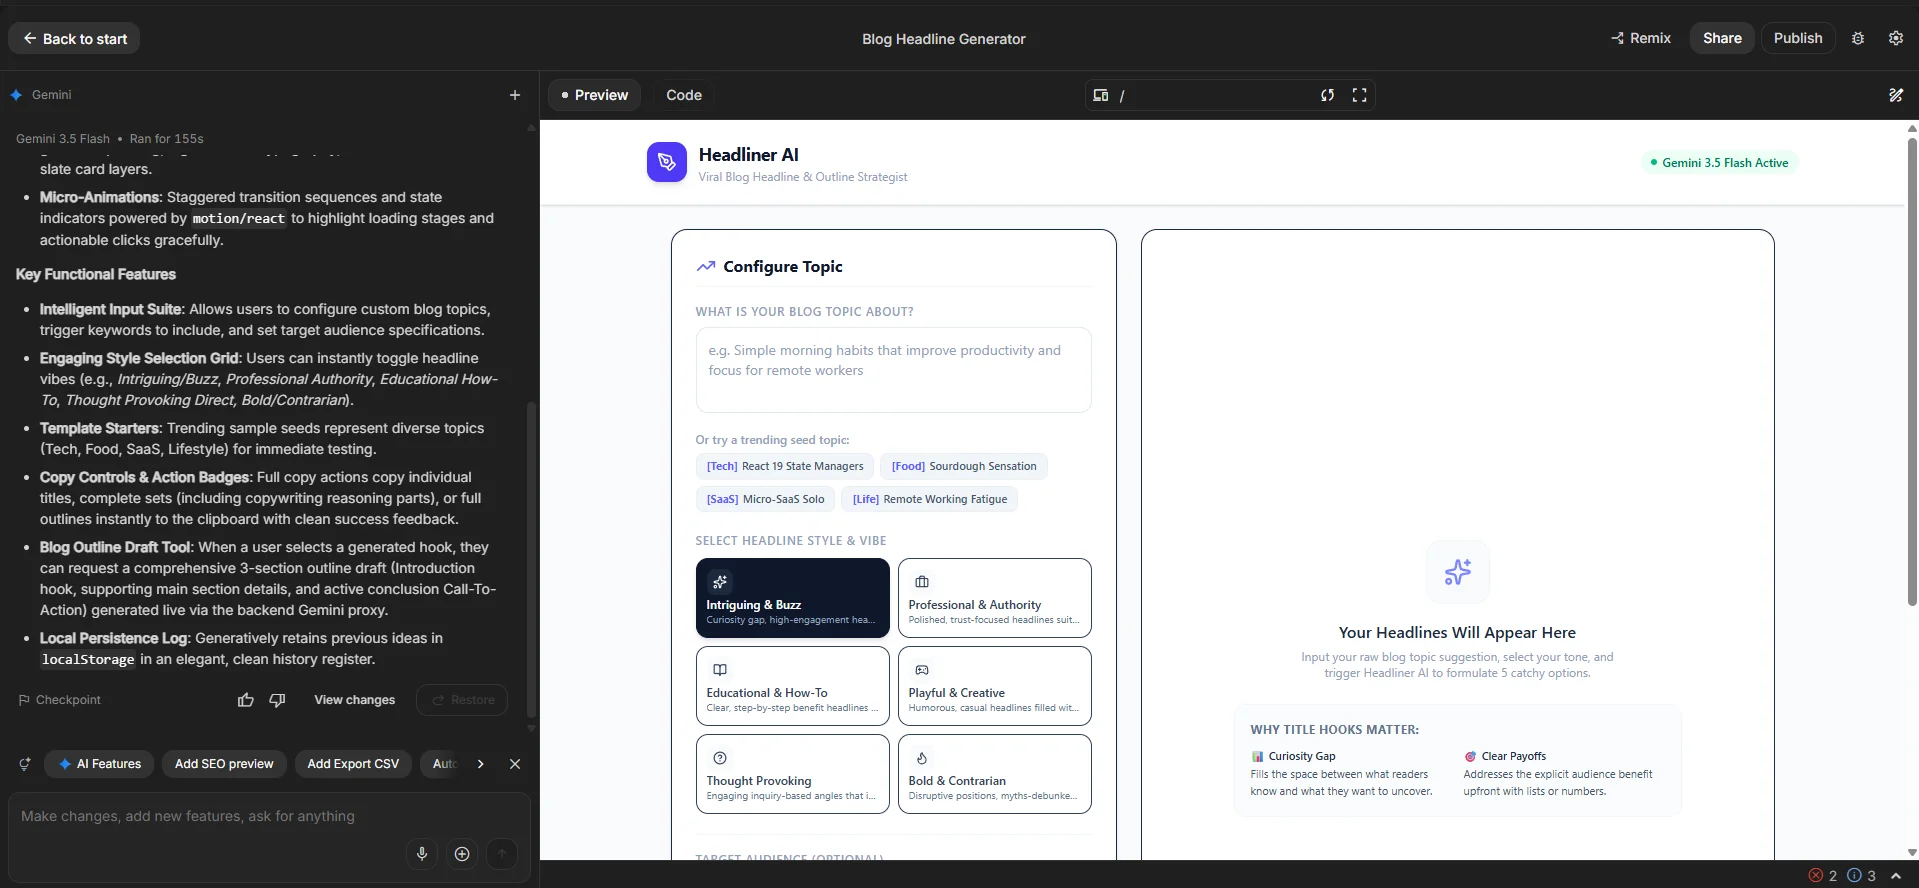
This is the feature that makes people sit up. Open the Build tab, describe an app in plain English, and AI Studio writes the whole thing for you. Real, working software, with a live preview you can click around in. No coding knowledge required. People call this "vibe coding," and it's exactly as fun as it sounds.
You might type something like "build a simple tool that turns a list of blog topics into catchy headlines." A few moments later, you have a working app on the screen. Then you refine it by chatting: "make the button blue," "add a copy-to-clipboard option," "change the headline to something friendlier." You can even draw directly on the preview and describe the change you want.
If you don't know where to start, two shortcuts help. There's an "I'm Feeling Lucky" button that invents a project idea for you, and there's the Gallery, a library of example apps you can open and copy with one click. For beginners, copying something from the Gallery and tweaking it is the fastest way to feel the magic on day one.
If an app breaks: Sometimes the generated code has a hiccup. The fix is almost always to type "fix any build issues with the current code" into the chat and let it sort itself out. This is normal, not a sign you did something wrong.
When your app is ready, you can keep it private, share a link with a friend or client, or publish it to the web with Google Cloud Run. Your first two apps deploy free with no credit card required, which is plenty for testing an idea or showing a client a quick prototype.
Hands-On: Build Your Own Content Assistant in 10 Minutes
Reading about a tool only gets you so far. Let's actually make something you'll use again. We're going to build a reusable content assistant in the Playground that writes in your voice. This costs nothing, can't break, and teaches the most valuable skill in the whole platform: writing good system instructions.
The example below is built for a freelance social media manager, but swap in your own details and it works for any business.
- Open Google AI Studio at aistudio.google.com and click into the Playground on the left. Make sure the toggle at the top is set to Models.
- In the right panel, confirm the model is Gemini 3.5 Flash. It's the default and it's free.
- Find the System instructions box near the top of the right panel and click into it. This is where your assistant gets its personality.
- Paste in a clear job description for your assistant. Use the example below as your template and edit the details to match you.
- Set the Temperature to around 0.8. Marketing copy benefits from a little creativity, so we want it slightly loose rather than robotic.
- In the prompt box at the bottom, type a real request, like "Write 3 Instagram caption options for a local bakery launching a new sourdough loaf." Hit Run.
- Read the results. Too formal? Edit your system instructions and run again. Keep adjusting the instructions, not the prompt, until the style is right. That's the whole skill.
Here's a system instructions template you can copy and shape to fit your own work:
Notice what just happened. You didn't write a single line of code, and you now have a custom AI tool tuned to your exact needs. Every time you open this session, your assistant remembers its job. You can build a different one for blog intros, another for client emails, another for product descriptions. This is the quiet power of AI Studio: not one generic assistant, but a whole team of specialists you design yourself.
Save your work: Sessions live under History on the left, but the surest way to keep a setup is to click "Get code" at the top, which hands you a copy of your exact configuration. Treat that as your real save button for anything important.
What It Costs (And When You Actually Pay)
Let's be clear and honest about money, because "free" always has fine print somewhere. The AI Studio interface itself is genuinely free to use, forever. You can prompt, generate images, test video, and build apps without spending a cent or entering a card.
The place costs can appear is the API, which is the plumbing that lets an app you've built keep calling Gemini after it leaves the Studio and gets real traffic. Even then, there's a generous free tier. You only pay once your usage crosses those free limits, and the AI Studio interface itself is not what gets billed.
A few numbers help you plan. When you do reach paid usage, charges are measured per million tokens, which is roughly 750,000 words. The everyday Gemini 3.5 Flash model runs about 1.50 dollars per million words in and 9 dollars per million words out. For a solopreneur testing ideas and running small tools, you can do an enormous amount of work and never see a bill. The costs only get serious if you launch something that thousands of people use.
Pro tip: For learning, experimenting, and running personal tools, assume it's free. Only start watching costs once you've deployed an app that's getting real public traffic. Until then, build freely.
One honest caution. If you publish an app to the web and share it widely, every visitor's usage is billed to your account. That's fine for a client demo or a small audience. Just don't paste a public link to a heavy AI app in front of a huge crowd and forget about it. Keep an eye on the Dashboard if an app starts getting popular.
Real Ways to Put This to Work
Enough theory. Here's how actual people in your shoes are using Google AI Studio to save time and money. Pick one that fits your week and try it.
For freelancers and solopreneurs
Build a content assistant tuned to each client's voice using system instructions, so every caption, email, and post already sounds like them. Generate ad creative with Nano Banana, including the headline text baked right into the image. Spin up a quick client-facing tool, like a quote calculator or an intake form with smart summaries, and share it as a link to look far more established than your team size suggests.
For small business owners
Turn on Google Search grounding and ask for current, sourced answers about your market or competitors. Make a "chat with my documents" helper that answers questions from your own product sheets and policies, which is gold for customer support. Generate a week of social graphics and short video clips in an afternoon instead of paying three separate tools to do it.
For students and lifelong learners
Use the long memory of these models to feed in a dense textbook chapter and get a plain-English study guide. Build a flashcard app in Build mode without writing code. Turn on Code execution to check math and data work step by step. And honestly, just play. The fastest way to get good at AI is to use a free tool with no meter running, and that's exactly what this is.
A note on practice: You don't learn this by reading. You learn it by opening the Playground and typing something badly, then fixing it. The people who get great at AI aren't smarter, they've just clicked Run more times than everyone else.
Mistakes and Gotchas to Avoid
A few things trip people up early. Knowing them in advance saves you frustration.
Ignoring system instructions
The biggest beginner miss. If your results feel generic, you almost certainly skipped this box. Fill it in first.
Editing the prompt to fix tone
When the style is wrong, fix the system instructions, not the individual prompt. Style is a standing order, not a one-off.
Not turning on Search grounding
For anything factual or recent, leaving Search off invites made-up answers. Flip it on and get sources.
Reaching for Pro too soon
Gemini 3.5 Flash handles most work beautifully. Save the heavier Pro model for genuinely hard problems.
And one safety note for the app builders. If you ever download an app you made and plan to host it yourself, do not paste a real, private API key into code that runs in someone's browser. Anyone using the app could see it. Inside AI Studio and when you deploy through Google Cloud Run, this is handled for you automatically. The risk only appears if you go off on your own with the downloaded files, and for most beginners that won't come up at all.
Remember: This tool changes fast. Google updates it almost weekly, so a button might move or a model name might change. The ideas in this guide hold up even when the screen shifts. Don't panic if your layout looks slightly different.
Your Next 20 Minutes
Most guides end with a tidy summary. This one ends with an assignment, because that's what actually helps. You now understand what Google AI Studio is, how the Playground works, what the settings do, what you can create, and how to build a real tool. The only thing left is to use it.
So here's your next move. Open aistudio.google.com, go to the Playground, and build the content assistant from Section 07. Give it your real voice, ask it for something you actually need this week, and keep tweaking the system instructions until it nails your style. That single exercise teaches you more than another hour of reading ever could.
Then, when that feels easy, wander into the Build tab and copy an app from the Gallery just to see your own idea come alive on screen. The gap between "I wish I had a tool that did X" and "I made a tool that does X" used to be enormous. For people running their own show, with no team and no budget for developers, that gap just got very, very small. Go close it.
One thing to remember: You don't need to understand all of it to start using it. Open the Playground, type something, and click Run. Everything else you learn by doing.