Lights, Camera, Prompt!
Most AI images look fake. Learn the beginner workflow, and the exact copy-paste prompts, that turn one photo into a realistic, consistent, cinematic scene that actually moves.
Most AI images look fake. You know the look. Skin like polished plastic, lighting flat as a passport photo, everything a little too clean to believe. People blame the tool. The tool is almost never the problem.
The problem is that we treat these models like a magic button. We type a few words, press generate, and hope. Real photographers and cinematographers don't work that way. They control the light, the lens, and the texture on purpose, and that control is exactly what separates an image that looks like a screensaver from one that looks like a frame from a film.
This guide walks you through a complete beginner workflow that takes you from one photo all the way to a moving scene. You'll make a still that actually looks real, expand it into a set of consistent camera angles, and then bring it to life as a short video clip. Every technique here works no matter which AI tools you own, and you'll get the exact copy-and-paste prompts for each step. By the end you'll have a repeatable process you can run in about fifteen minutes.
Why AI Images Look Fake
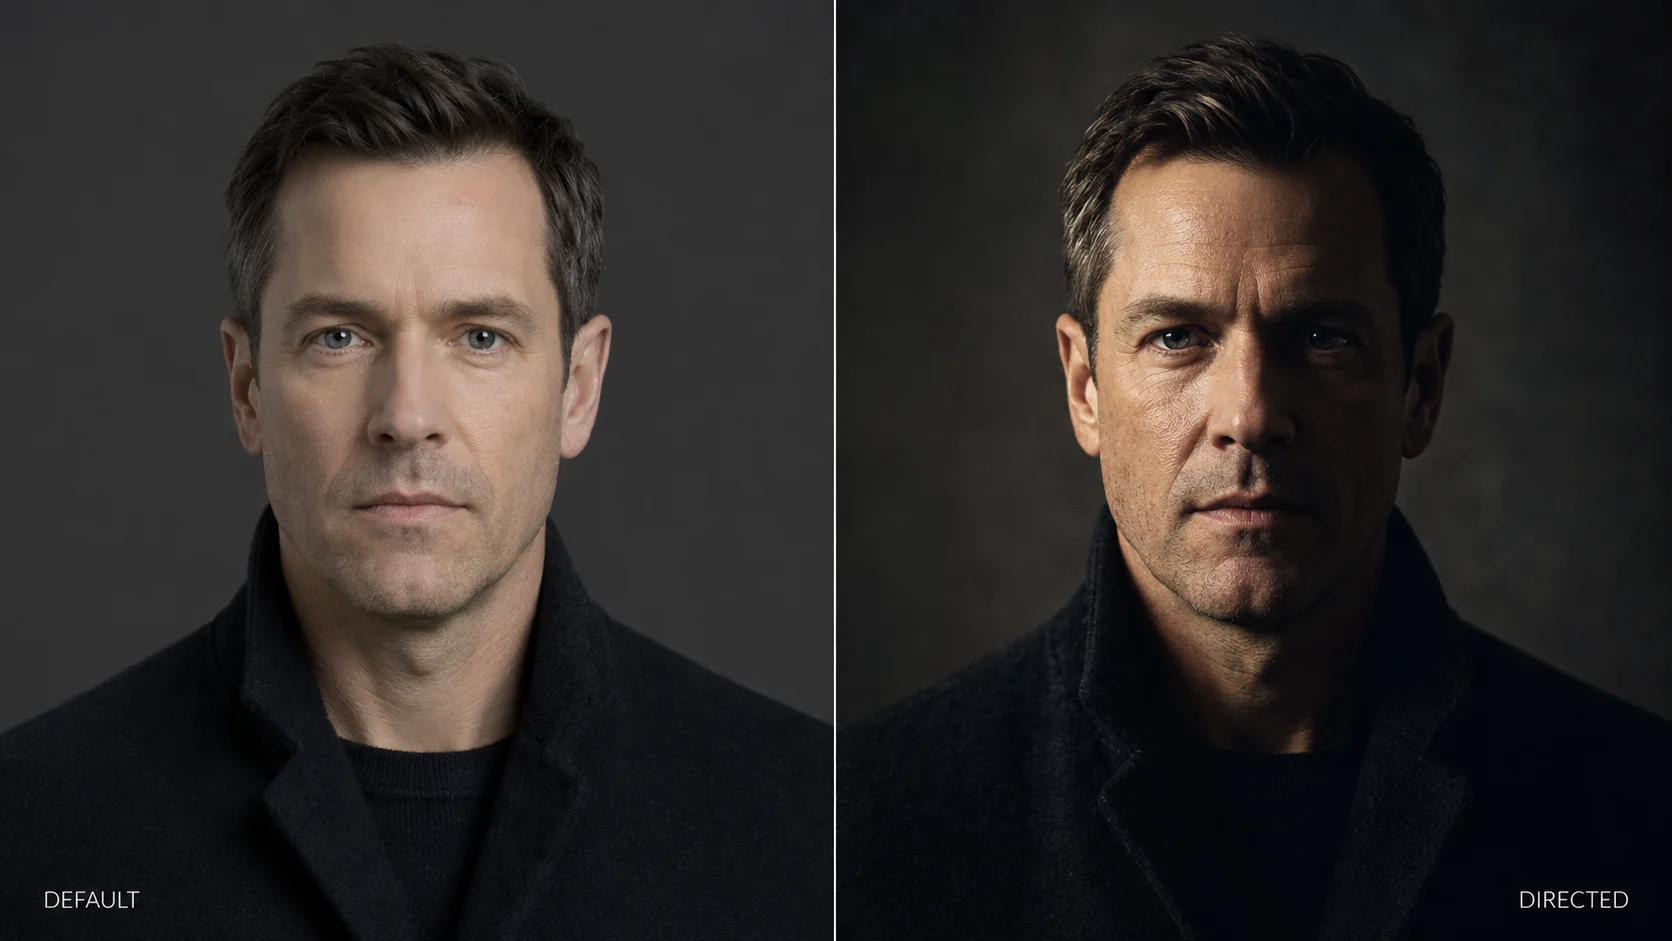
Here's the first thing to understand, and it changes how you'll prompt forever: an AI image model does not understand "style" or "mood" the way you do. If you don't describe the light, it makes something up, and what it makes up is almost always the most average, most generic version possible. Think of a built-in camera flash firing straight at a face. No depth, no shadow, no shape. That flat default is the single biggest reason your images scream "AI."
The second reason is the opposite problem, and it surprises people. When a face is too perfect, your brain rejects it. No pores, no stray hairs, no tiny asymmetry, no texture. Real skin has all of that. Real fabric has weave and wrinkles. Real photos have a little grain. When the model scrubs all of that away in the name of looking "clean," it lands in the uncanny valley instead. So part of your job, oddly enough, is to add imperfection back in on purpose.
Put those two ideas together and you get the whole mindset shift. You are not asking a machine for a pretty picture. You are directing a photo shoot with words. You decide where the light comes from, what lens you're shooting on, and how much texture stays in the frame. Once you think like the director instead of the button-presser, your results change immediately.
The core shift: Stop describing what you want the picture to be ("a cool cinematic portrait") and start describing how it was shot (the light, the lens, the texture). The model can't read your taste. It can follow camera instructions.
The 70/30 Rule of Realism
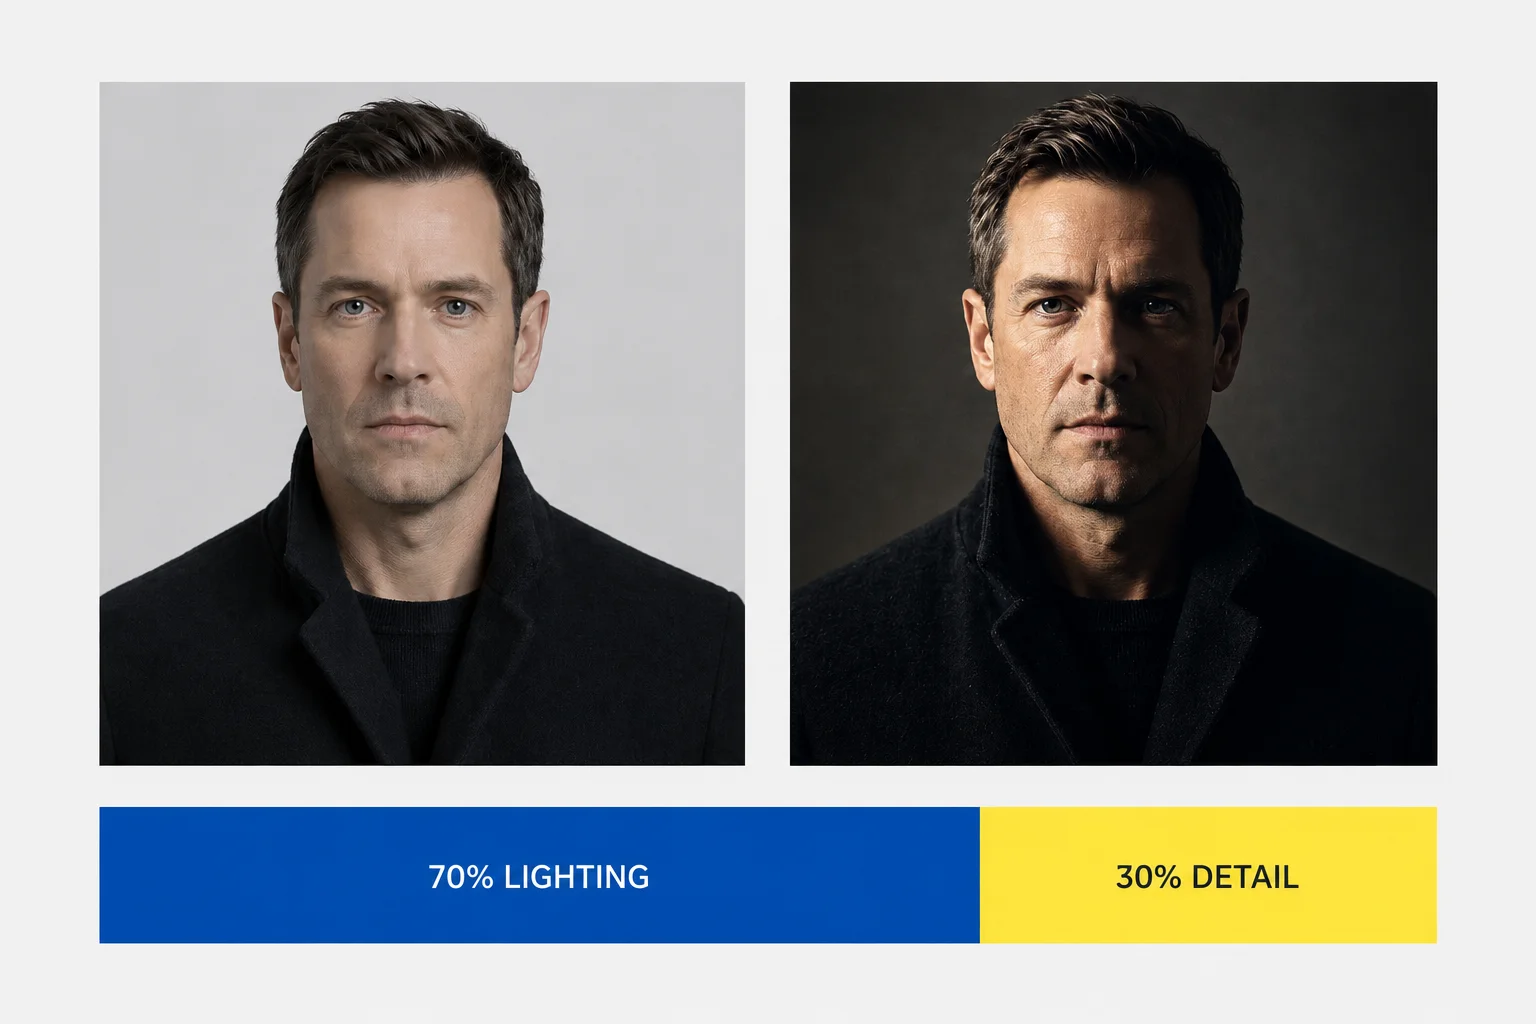
If you remember one thing from this guide, make it this. Realism is roughly 70% lighting and 30% detail. Most beginners spend all their effort on the subject ("a woman in a red dress") and almost none on the light. That's backwards. The light is what carries the realism, and the detail is what seals it.
Lighting is the 70%. When you name where the light comes from and how hard it is, you give the image depth and shape. Side light rakes across a face and reveals texture. Shadows give a sense of volume, so the person looks like they occupy real space instead of floating on a sticker. Skip this, and you're back to the flat flash look.
Detail is the other 30%, and this is where the deliberate imperfection lives. Pores, skin texture, a little stubble, fabric weave, and a touch of film grain all tell the viewer's brain "this was captured by a real camera." None of it is fancy. It's just a handful of words you learn to add every time.
Flat light (the default)
No described light means a simulated built-in flash. No depth, no shadows, no shape. The number one AI tell.
Plastic faces (too perfect)
Zero pores or texture reads as synthetic. Perfection is what pushes an image into the uncanny valley.
Directed light (the fix)
Name the direction and hardness. Side light and real shadows create the volume that sells realism.
Imperfection (the seal)
Pores, grain, texture, and micro-contrast tell the brain a real camera captured this moment.
Read the Light Like a Director
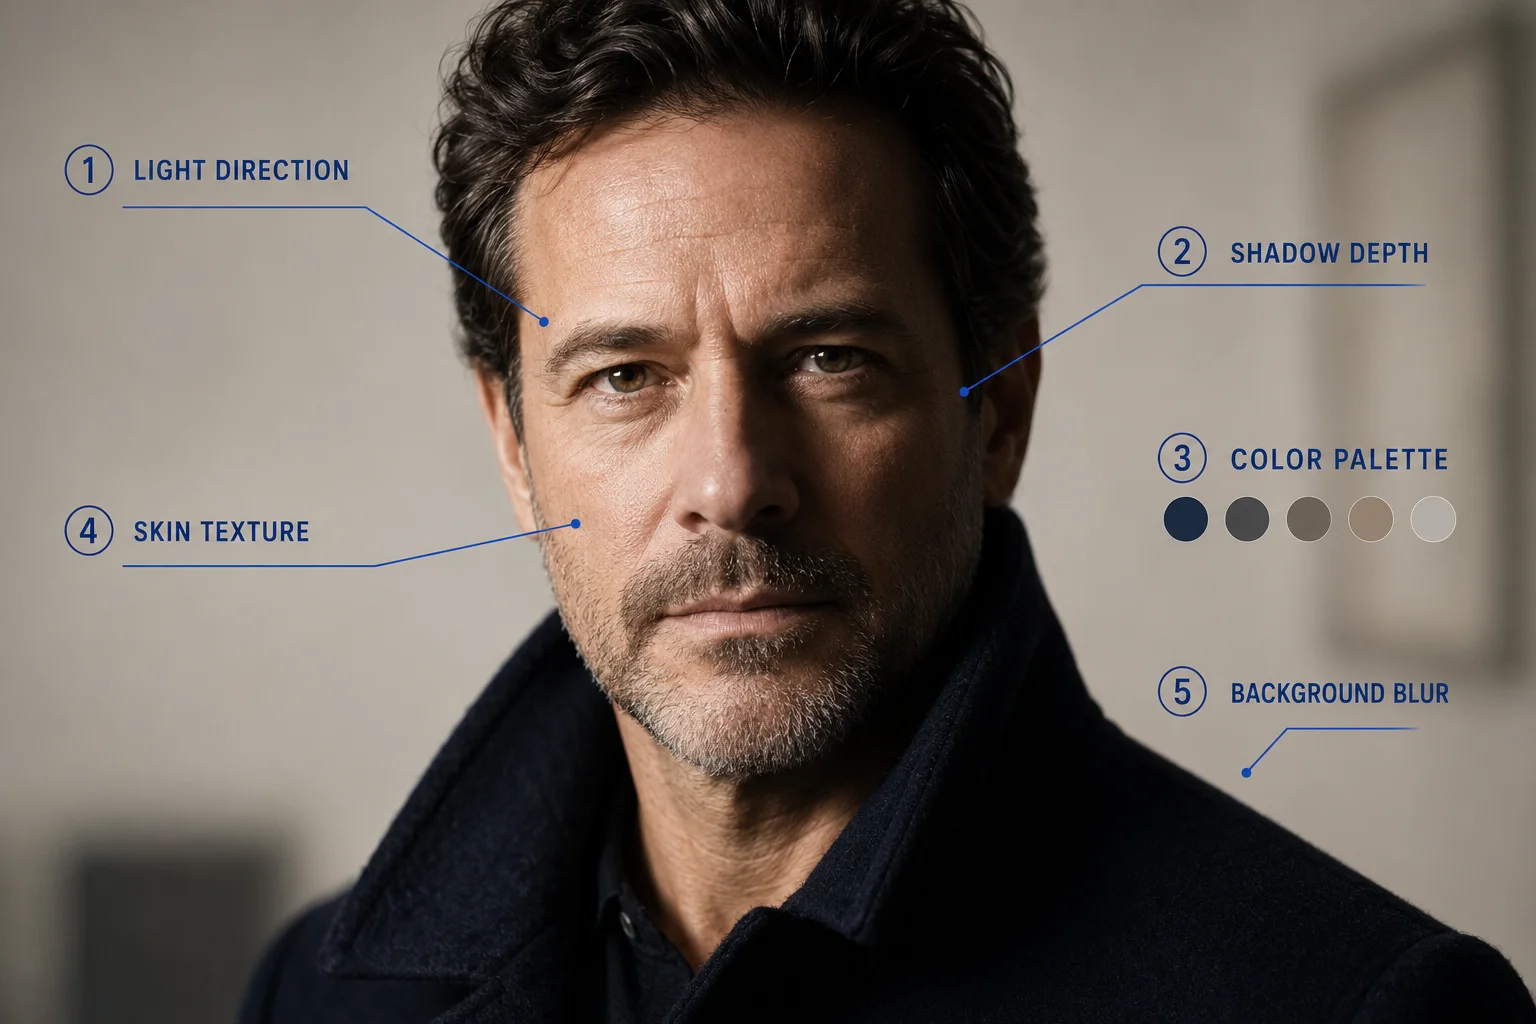
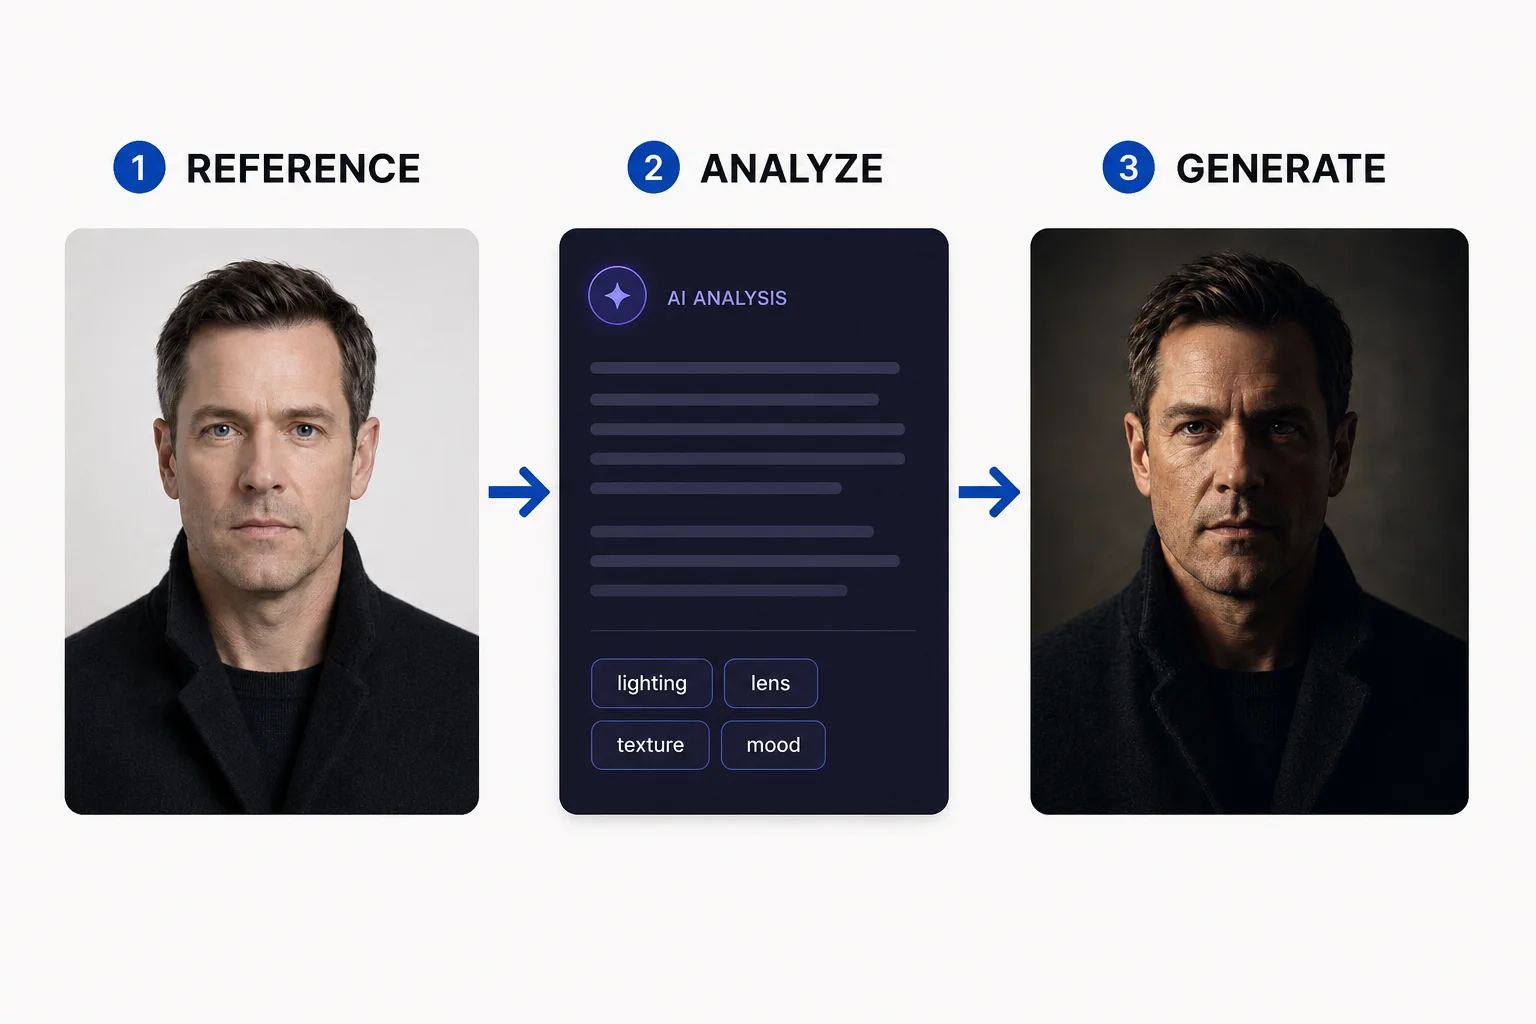
Before you write a single prompt, you need to learn to see. This is the skill that quietly separates good AI work from generic AI work, and it costs you nothing but a few minutes of attention. Find a reference photo you love, then read it like a cinematographer would.
Pinterest is a great place to hunt for references. Look for a portrait or a shot with a mood you want to recreate, and then run down this checklist:
- Where is the light coming from, and is it soft or hard?
- How deep are the shadows?
- What is the color palette?
- What textures show up on the skin or surfaces?
- Is the background sharp or blurred?
- What is the exact style you want to recreate, not just "a nice portrait"?
That last point matters more than it looks. Your goal is to recreate a specific look, not to ask for something vaguely pretty. Vague in means vague out. Specific in means the model has something real to aim at.
There's also a two-part trick worth knowing. In most image tools, a written prompt gives you structure (the pose, the framing, the scene), while an uploaded reference image gives you style (the palette, the grain, the feel). Use both together and you get the strongest resemblance. If your tool lets you drop in a reference image alongside your text, always do it.
Reference gives style, prompt gives structure. If you can only get one right, get the lighting description right. If you can use both a text prompt and a reference image at once, do that every single time.
Your Prompt-Writing Assistant
If you don't yet know your lenses from your f-stops, don't worry. You can borrow a professional eye. Open any chat AI that can see images (ChatGPT, Google's Gemini, Claude, or similar), upload your reference photo, and hand it the prompt below. It will study the image like a Director of Photography and hand you back a technical prompt you can drop straight into your image generator.
Analyze this image as a professional photographer and Director of Photography. Describe everything in extreme precision: pose, head angle, expression, body position, lighting style, light direction, shadows, lens choice, focal length, depth of field, color grading, textures, clothing, composition, and overall mood. Be anatomically and visually accurate to what is truly visible in the image. After the analysis, create a full, technically accurate Midjourney v7 prompt that recreates the same visual style and pose. Output two sections: Professional visual description, Full Midjourney v7 prompt in one paragraph (no bullet points).
Three quick notes on using it. First, it asks for a "Midjourney v7 prompt," but the output is really just a well-structured photographic description, so it works fine in whatever image tool you prefer. If you use Midjourney, know that the model has moved on to newer versions since this prompt was written, and the version flag simply pins which model runs. The lighting and texture language is what does the heavy lifting, and that carries across every tool. Second, do the analysis step even when you think you already know the shot. The AI often catches lighting details your eye glossed over. Third, once you have the generated prompt, read it. You'll start absorbing the vocabulary, and soon you'll write these yourself.
Why each ingredient earns its place
A good prompt isn't a pile of buzzwords. Every phrase is doing a specific job. Here's the reasoning behind the ingredients you'll see over and over, so you understand what you're actually asking for.
| Prompt ingredient | What it does |
|---|---|
| Dramatic side light | Creates high contrast and reveals texture in skin and fabric. Builds volume so the image stops looking flat. |
| Rembrandt lighting | Adds depth and a classic, painterly "Old Master" mood that reads as professional. |
| Deep shadows on one side | Creates mystery and tension. Hiding half the face pushes the viewer to focus on the lit eye. |
| 85mm portrait lens | Gives natural, correct facial proportions the way a real portrait lens would. |
| Sharp focus on the eyes | Makes the subject feel alive. Blurry eyes break the connection with the viewer. |
| Skin texture, pores, stubble | Removes the digital plastic effect. This is your deliberate imperfection. |
| Film grain | Makes the frame feel like it was shot on a real camera, not rendered. |
| Muted colors | Give the shot a cinematic tone instead of a candy-bright, obviously-AI palette. |
| Raw style | Tells the model not to over-stylize. Aim for unedited photography, not a painting or cartoon. |
| Aspect ratio (like 4:5) | Sets the canvas shape. 4:5 is a vertical rectangle, slightly taller than a square, and flattering for portraits. |
Notice that these are the same terms a photographer uses on a real set. That's the whole point. You're not learning "AI tricks," you're learning to speak the language of the image you want.
The Anti-Plastic Audit
Here's a power move for anyone who wants cleaner results with fewer rejected generations. Before you send a prompt to your image tool, run it through a second AI that acts as a prompt architect. It checks two things at once: whether your prompt has technical or policy problems, and whether it has enough realism baked in to avoid that plastic look.
Paste the prompt below into a chat AI, then give it your rough image idea. It will return a cleaned-up, realism-boosted version ready to generate.
Act as a Lead Midjourney v7 Prompt Architect and Compliance Officer.

Your goal is to take a raw user concept and process it through two distinct phases:
1. The Technical Audit (Fact Check & Syntax).
2. The Aesthetic Upgrade (Anti-Flatness).

### PHASE 1: THE TECHNICAL AUDIT (Fact Check)
Before writing the prompt, you must analyze the request for the following specific errors:
- **ToS/Safety:** Check for prohibited terms (Graphic violence, sexual content, deepfakes of real people).
- **Syntax:** Ensure parameters use double dashes (e.g., `--ar 4:5`, not `ar:4:5`).
- **Logic Conflicts:** Identify contradictions (e.g., "Macro shot of a galaxy," "Sunny night").
- **Token Economy:** Ensure the prompt is concise enough to avoid truncation.

### PHASE 2: THE AESTHETIC UPGRADE (Anti-Flatness)
Midjourney v7 defaults to smooth, "plastic" images. You must inject:
- **Lighting Depth:** Chiaroscuro, volumetric lighting, or harsh rim lights.
- **Surface Imperfection:** Pores, scratches, dust, oxidation, or fabric weave.
- **Optical Reality:** Specific lens focal lengths (e.g., 85mm), aperture (f/1.8), and ISO grain.
- **Parameters:** Always end with `--style raw --v 7` (and a stylized value if appropriate).

---

### YOUR OUTPUT FORMAT
You must respond in exactly this structure:

## PHASE 1: FACT CHECK & SYNTAX REPORT
**1. Safety/Moderation:** [Pass/Fail - Note on trigger words]
**2. Syntax & Parameters:** [Review of --ar, --v, etc. Fix double dashes.]
**3. Logical Conflicts:** [Check lighting vs. camera vs. subject.]
**4. Formatting/Banned Terms:** [Check for "bloody," "nude," or formatting errors.]

## PHASE 2: REFINED PROMPT
[The final, polished prompt block ready for copying]

## CHANGES EXPLAINED
[Brief bullet points on how you fixed flatness and syntax]
Even if you never touch Midjourney, this prompt is worth keeping. The "Anti-Flatness" section is a checklist of everything that makes an image look real: lighting depth, surface imperfection, and optical reality like specific lens lengths and grain. Reading its output a few times will teach you more about realistic prompting than any word list. And the safety pass is a nice bonus, since it catches the terms that get generations blocked before you waste a credit.
Power tip: Keep both prompts from Sections 04 and 05 in a notes file. One reads a reference and writes a prompt. The other audits and upgrades a prompt. Together they cover almost everything you need to get a realistic still.
One Image, Every Angle
Now you have a still you're happy with. Here's where beginners usually hit a wall. You want more shots of the same character, from different angles, but every time you generate, the AI changes the face, the outfit, or the vibe. Consistency is genuinely hard, and there are complex professional methods for locking it down. This is not one of those. This is the fast, practical version that gets you most of the way there in a single generation.
The technique is called the grid. You take one image and ask the model to produce a sheet of several new camera angles of that exact same scene. Instead of generating each angle separately and praying they match, you get them all at once, which forces them to stay consistent. The result is basically an instant storyboard.
The secret ingredient is not fancy wording. It's constraint. The prompt spends most of its energy forbidding the AI from changing anything. Same character, same clothes, same lighting, same world. Only the camera moves. Copy this and run it with your image uploaded:
Create six new 2:3 cinematic images based on the reference scene, preserving ALL characters, creatures, objects, and environment elements exactly as they appear. Do NOT remove, modify, or reinterpret any character or object from the original scene. Only change camera placement, angle, and composition to create alternate close-up, medium, and wide shots of the same moment. Maintain consistent lighting direction, atmosphere, color palette, depth of field, and cinematic style. No redesigns, no new elements, no stylization changes. The final images must look like alternate photographs captured during the same professional shoot of the exact same scene.
Read the language and you'll see the pattern: "preserving ALL," "Do NOT remove, modify, or reinterpret," "No redesigns, no new elements." That's the identity lock. The final line does a lot of quiet work too, because "alternate photographs captured during the same professional shoot" is a phrase the model understands as a hard consistency rule.
One honest caveat. Faces in the wide shots can lose a little detail compared to the close-ups. That's a known trade-off, and for a storyboard or a quick animation base it's completely fine. You're building a working foundation, not a final gallery print.
Why square framing helps: A square canvas gives the model room to pack multiple vertical frames neatly into the grid. If your angles come out cramped or oddly cropped, try generating the grid on a square (1:1) canvas and slice the frames out afterward.
Bigger Grids, More Control
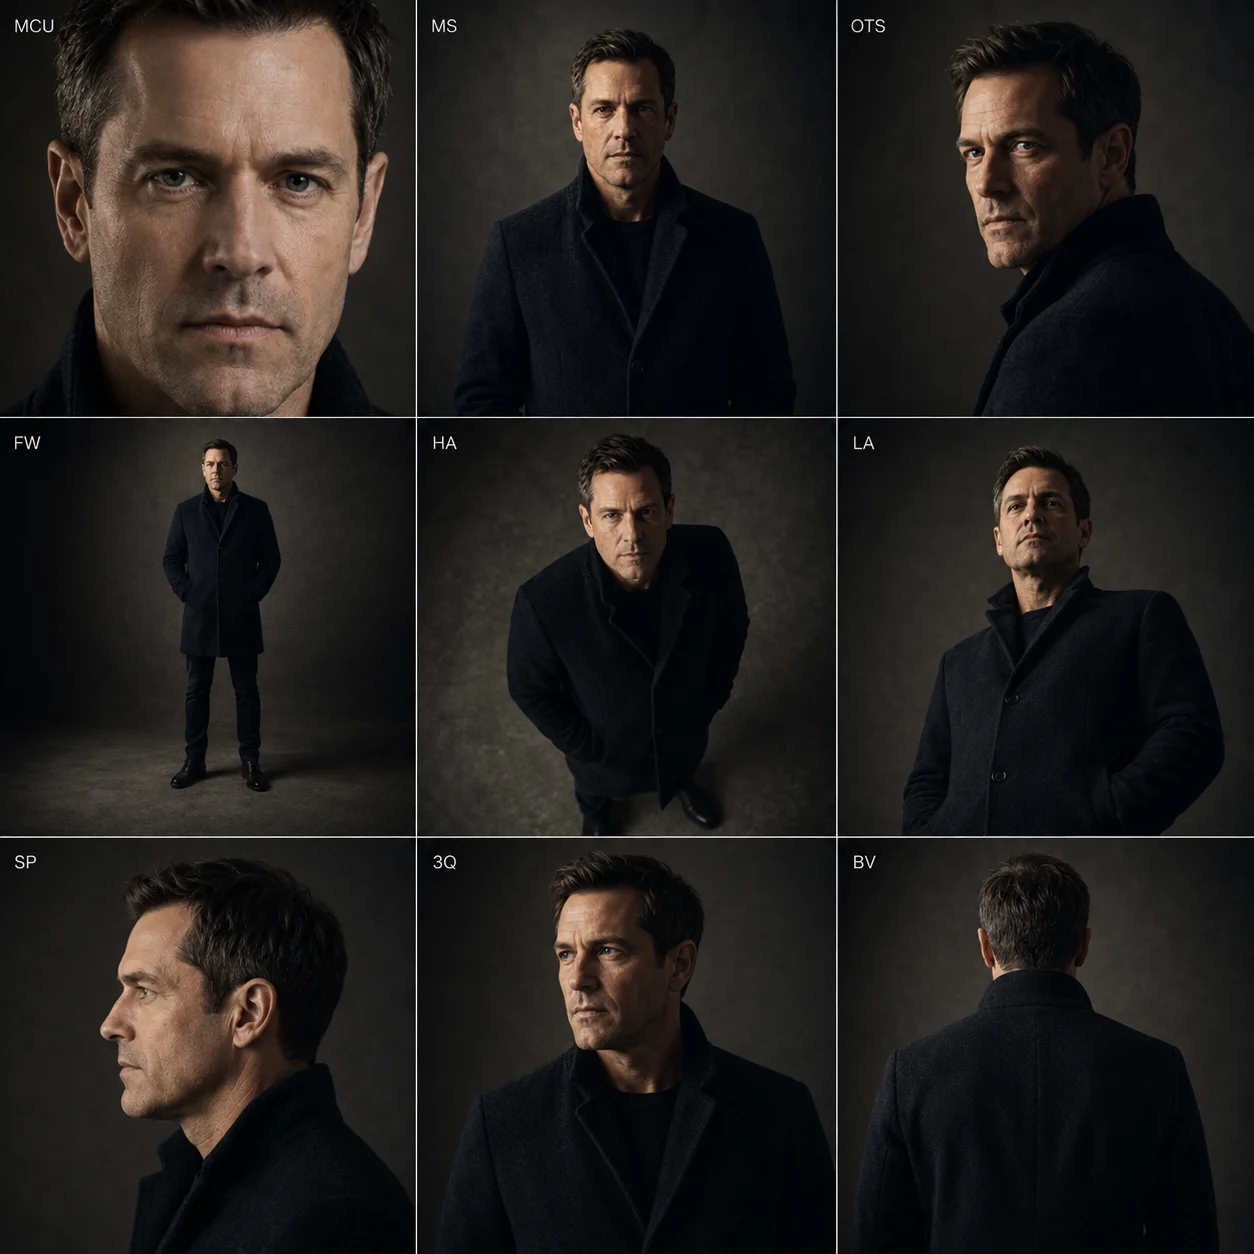
Once the basic grid clicks, you can reach for more control. The next prompt is written as a structured brief, almost like a mini config file, and it asks for a 3x3 grid of nine specific camera angles, each one defined precisely. It works the same way in practice: paste it, upload your image, generate. Use it when you want a wider range of shots and more creative direction.
{
 "project_name": "Auto_Cinematic_9_Angle_Grid_Generator",
 "version": "3.0 (Angle & Anatomy Focus)",

 "instructions_for_ai": {
 "step_1_analysis": "Analyze the input image for subject identity, lighting (e.g., prism effects, direction), skin texture, emotion, and color palette.",
 "step_2_inference": "If the input is a close-up, you must logically infer the subject's outfit, body type, and environment based on the style of the face. Maintain strictly consistent character design across all 9 panels.",
 "step_3_execution": "Generate a 3x3 grid where each panel corresponds to the specific camera definitions below."
 },

 "camera_angle_specifications": {
 "MCU": "Macro Close Up: Focus intensely on facial details, eyes, or textures. Crop top of head and chin.",
 "MS": "Medium Shot: Waist or chest up. Standard cinematic portrait framing.",
 "OS": "Over the Shoulder: Camera placed behind a vague foreground element/shoulder, looking at the subject.",
 "WS": "Wide Shot: Full body shot. Show the subject's posture, outfit, and relationship with the environment.",
 "HA": "High Angle: Camera is physically higher than the subject, looking down. Emphasize vulnerability.",
 "LA": "Low Angle: Camera is physically lower than the subject, looking up. Emphasize dominance.",
 "P": "Profile: Strictly from the side (90°).",
 "ThreeQ": "3/4 View: Subject turned 45° away from the camera.",
 "B": "Back View: Camera directly behind the subject."
 },

 "output_format": {
 "grid_layout": "3x3",
 "aspect_ratio": "16:9",
 "labeling": "Include white text labels (MCU, MS, etc.) in the top-left corner of each panel."
 },

 "final_prompt_instruction": "Using the input image as the absolute ground truth for character and style, generate a photorealistic 3x3 grid. Follow the exact camera angle definitions above. Maintain identical lighting and color grading in every shot.

Grid Order:
Row 1: MCU, MS, OS
Row 2: WS, HA, LA
Row 3: P, ThreeQ, B"
}
Don't let the format scare you. You don't need to understand JSON to use this. The model reads it as a clear set of instructions: nine named angles, a fixed layout, and a rule to treat your uploaded image as the "absolute ground truth" for the character. That last phrase is the identity lock again, just stated more forcefully.
There's also a more editorial variation built for fashion and beauty looks. It produces a six-frame contact sheet with dramatic, unexpected angles while holding wardrobe, hair, makeup, and lighting perfectly consistent. Reach for this when you want shots that feel like a magazine spread rather than a plain turntable.
Analyze the input image and silently inventory all fashion-critical details: the subject(s), exact wardrobe pieces, materials, colors, textures, accessories, hair, makeup, body proportions, environment, set geometry, light direction, and shadow quality. All wardrobe, styling, hair, makeup, lighting, environment, and color grade remain 100% unchanged across all frames. Do not add or remove anything. Do not reinterpret materials or colors. Do not output any reasoning. Your visible output must be: One 2×3 contact sheet image (6 frames). Then a keyframe breakdown for each frame. Each frame must represent a resting point after a dramatic camera move — only describe the final camera position and what the subject is doing, never the motion itself. The six frames must be spatially dynamic, non-linear, and visually distinct. Required 6-Frame Shot List High-Fashion Beauty Portrait (Close, Editorial, Intimate) Camera positioned very close to the subject's face, slightly above or slightly below eye level, using an elegant offset angle that enhances bone structure and highlights key wardrobe elements near the neckline. Shallow depth of field, flawless texture rendering, and a sculptural fashion-forward composition. High-Angle Three-Quarter Frame Camera positioned overhead but off-center, capturing the subject from a diagonal downward angle. This frame should create strong shape abstraction and reveal wardrobe details from above. Low-Angle Oblique Full-Body Frame Camera positioned low to the ground and angled obliquely toward the subject. This elongates the silhouette, emphasizes footwear, and creates a dramatic perspective distinct from Frames 1 and 2. Side-On Compression Frame (Long Lens) Camera placed far to one side of the subject, using a tighter focal length to compress space. The subject appears in clean profile or near-profile, showcasing garment structure in a flattened, editorial manner. Intimate Close Portrait From an Unexpected Height Camera positioned very close to the subject's face (or upper torso) but slightly above or below eye level. The angle should feel fashion-editorial, not conventional — offset, elegant, and expressive. Extreme Detail Frame From a Non-Intuitive Angle Camera positioned extremely close to a wardrobe detail, accessory, or texture, but from an unusual spatial direction (e.g., from below, from behind, from the side of a neckline). This must be a striking, abstract, editorial detail frame. Continuity & Technical Requirements Maintain perfect wardrobe fidelity in every frame: exact garment type, silhouette, material, color, texture, stitching, accessories, closures, jewelry, shoes, hair, and makeup. Environment, textures, and lighting must remain consistent. Depth of field shifts naturally with focal length (deep for distant shots, shallow for close/detail shots). Photoreal textures and physically plausible light behavior required. Frames must feel like different camera placements within the same scene, not different scenes. All keyframes must be the exact same aspect ratio, and exactly 6 keyframes should be output. Maintain the exact visual style in all keyframes, where the image is shot on fuji velvia film with a hard flash, the light is concentrated on the subject and fades slightly toward the edges of the frame. The image is over exposed showing significant film grain and is oversaturated. The skin appears shiny (almost oily), and there are harsh white reflections on the glasses frames. Output Format A) 2×3 Contact Sheet Image (Mandatory)
A quick word on tools for this step. Any capable image model with strong editing and reference abilities can run a grid. Google's Nano Banana Pro, its Gemini image model, is especially good at understanding a subject across angles, and Midjourney and the image tools inside ChatGPT can do it too. Use whichever you already have. The prompt is the method. The tool is just where you paste it.
The Motion Bridge
This is where it gets fun. You have a set of consistent frames. Now you'll make them move. AI video has a reputation as a slot machine: press generate, and hope the face doesn't melt. We're going to stop gambling and start directing, using one simple technique that gives you real control.
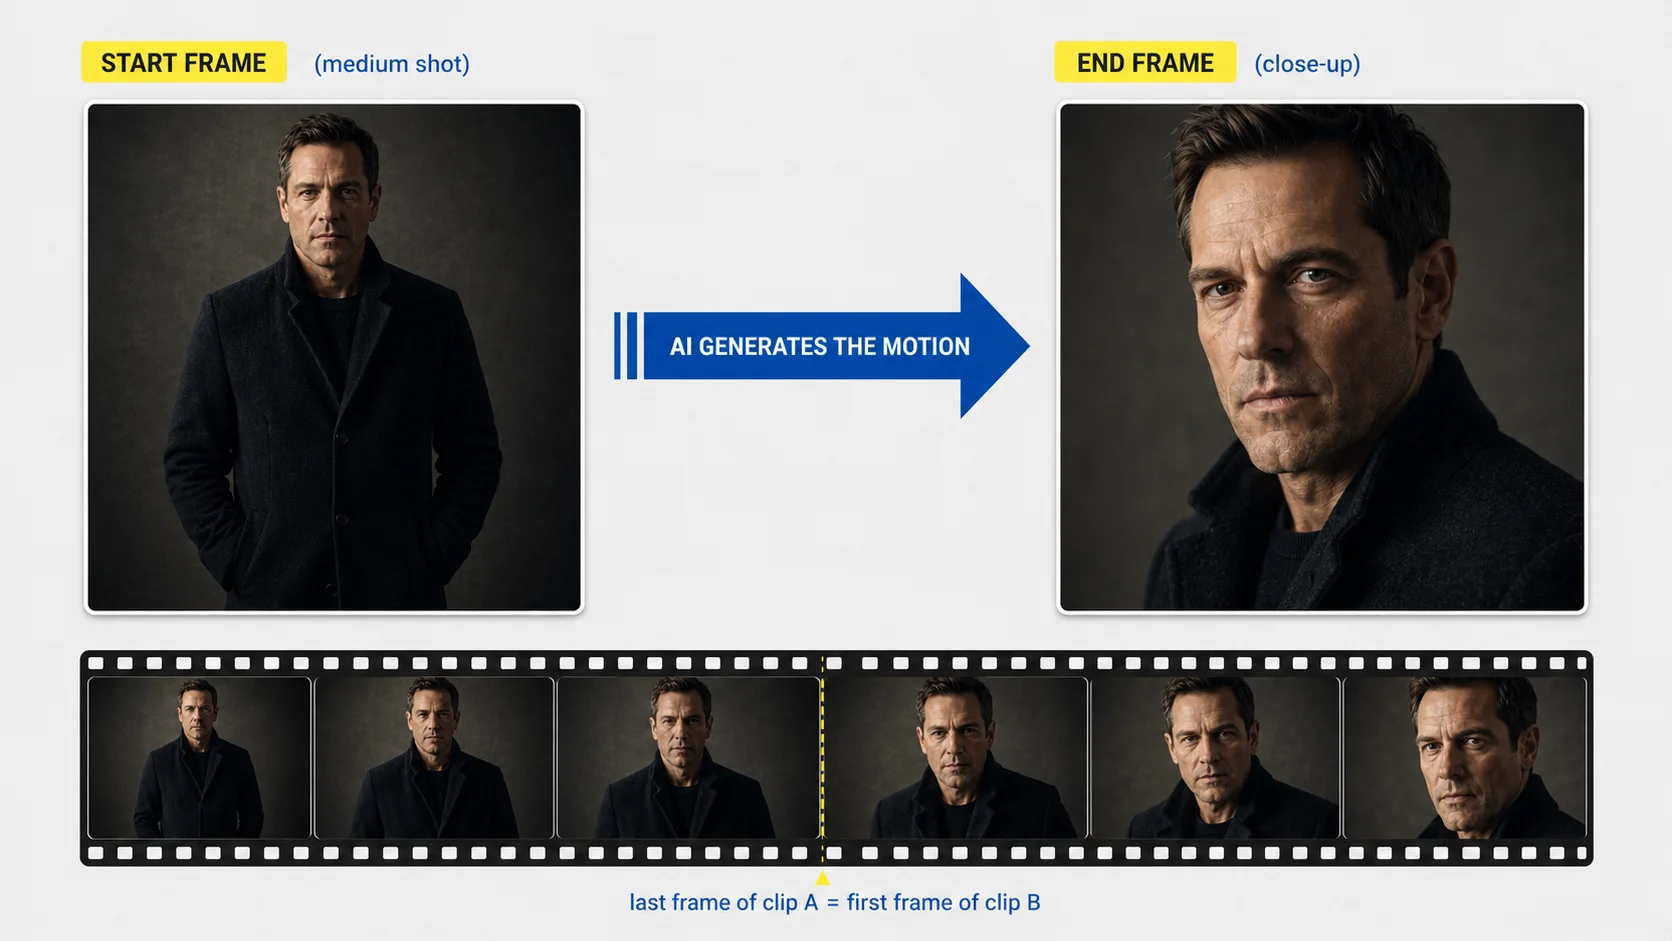
The trick is called a start and end frame. Instead of asking the AI to invent a whole video from scratch, you hand it two images from your grid: a starting shot and an ending shot. The AI only has to build the motion between them. Because both ends are locked to your consistent frames, the character can't drift into someone else halfway through. You're building a bridge, and you decide where both banks sit.
Before you upload, crop your two frames to a vertical video shape (a 9:16 canvas, roughly 1080x1920) so you control the composition before the AI touches it. Then load them as the start and end frames in an image-to-video tool.
The formula for the motion prompt
For video there's no single magic prompt, because every scene is different. But there is a reliable structure that keeps the AI from hallucinating. Describe the camera, keep the subject's action minimal, and set the mood:
[Camera Movement] + [Subject Action (Minimal)] + [Atmosphere/Lighting]
Here's what that looks like filled in for a grid shot:
Cinematic slow push in, smooth zoom on the face, the character remains stationary, high detail, warm lighting. No morphing, consistent features.
Notice the order. The camera does the moving, not the person. "The character remains stationary" and "no morphing" are there to stop the AI from reinventing the face. When people say their AI video looks like a melting nightmare, it's almost always because they left the prompt empty and let the model guess, or they asked the subject to do too much. Direct the camera, hold the subject still, and the melt goes away.
Don't know the camera terms? Borrow them
If words like "dolly zoom," "rack focus," or "truck left" mean nothing to you yet, let a chat AI write the motion prompt for you. Paste this and describe your two frames:
I have two images: a Start Frame (Medium Shot) and an End Frame (Close Up). Write 3 different prompts for Kling AI to generate a smooth 5-second video bridging these two images. Focus ONLY on camera movement and lighting consistency. Use professional cinematographic terms (e.g., slow push-in, rack focus, parallax). Keep it under 40 words.
Chain clips into a longer scene
Here's how you go past a single five-second clip. Take the last frame of clip A and use it as the first frame of clip B. Because clip B starts exactly where clip A ended, the two play back as one continuous, seamless shot. String a few of these together and you have a real sequence instead of an isolated moment.
Best practice: Keep your start and end frames visually close to each other. If they're too different, the AI has to invent a big jump and the motion gets messy. Small, believable changes between the two frames give you the smoothest results.
On tools: Kling AI popularized the start-and-end-frame workflow and still handles it well, and its prompt helper above names it directly. You have good alternatives, though. Google's Veo is a strong all-rounder with sound, Runway gives you fine camera control, and Hailuo is a solid free option that's especially good with faces. The start-and-end-frame idea works across most of them, so pick the one you can access and apply the same method.
Your 15-Minute Workflow
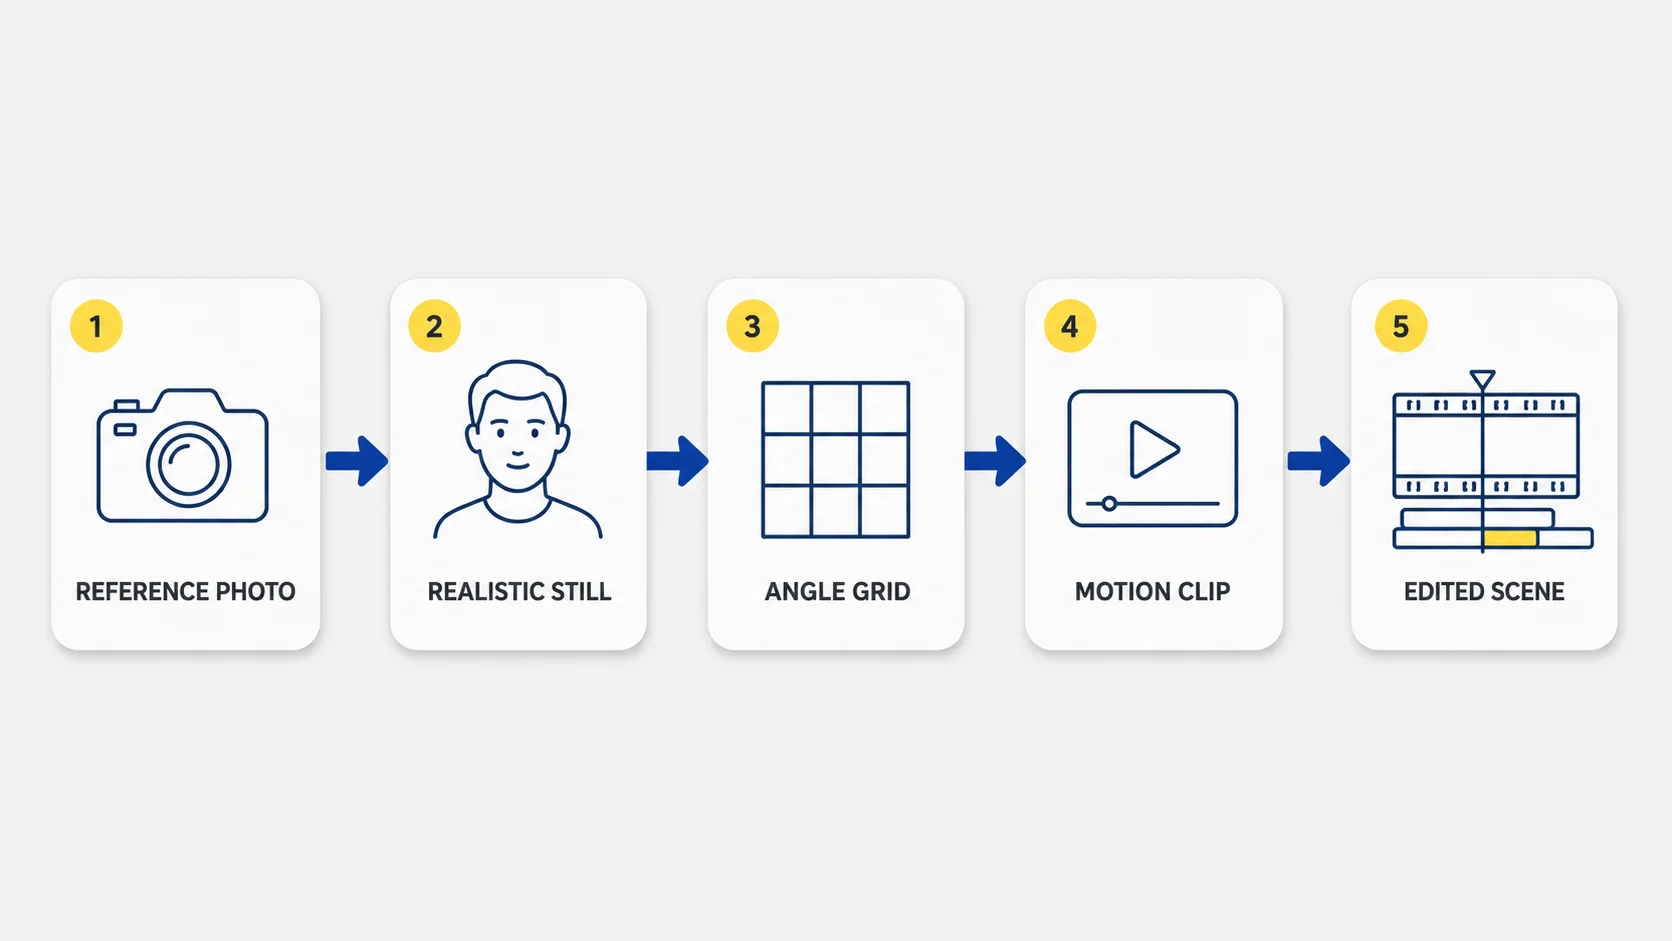
Let's put the whole thing together. Once you've done it once or twice, this entire pipeline takes about fifteen minutes, and none of the steps are hard on their own. Here's the run of show from blank screen to finished clip:
- Find a reference. Spend a few minutes on Pinterest and pick a shot with a look you want to recreate.
- Write the realistic prompt. Use the Director of Photography prompt from Section 04 to turn your reference into a technical prompt, then optionally run it through the anti-plastic audit from Section 05.
- Generate your still. Drop the prompt (plus your reference image if the tool allows) into your image generator and get a still that actually looks real.
- Grid it. Feed that still into the basic grid prompt from Section 06 to get a sheet of consistent camera angles.
- Bridge it. Crop two frames to vertical, load them as start and end frames, and use the motion formula from Section 08 to generate a clip.
- Chain and edit. Link a couple of clips, then trim them together in a free editor to finish the scene.
That final edit doesn't need to be fancy. A free tool like CapCut or DaVinci Resolve is plenty for trimming your clips, setting the pace, and adding music. The goal at this stage is a clean five-to-ten-second sequence, not a Hollywood cut. You can always polish later.
Pro tip: Save your best prompts and your favorite reference images in one folder. The people who get fast at this aren't more talented, they just stopped starting from scratch every time. Your prompt library is your real asset.
Now Go Make One
The gap between "AI looks fake" and "wait, that looks like a real film" is smaller than most people think. It isn't a better subscription or a secret model. It's a mindset and a handful of prompts. Once you start directing the light, locking the identity, and bridging your frames on purpose, the plastic look falls away and the cinematic look shows up in its place.
So don't just read this. Go run it once, start to finish, tonight. Pick one reference, make one still, grid it, and bridge two frames into a five-second clip. Your first pass won't be perfect, and that's the point. Every run teaches your eye something new about light and motion, and that eye is the thing that keeps working no matter how the tools change.
You already have everything you need. The prompts are above. The only missing piece is the first attempt.
The techniques and prompts in this guide are adapted from professional AI filmmaking training and rebuilt into a single beginner workflow for AI Black Magic users. Keep the prompts, run the process, and make it your own.