
Set Up Your Own Static Ad Generator
Generate twenty production-ready static ads for your brand in about an hour. This step-by-step guide covers every account, API key, and install you'll need before your first run. Written for users who are new to AI tools and don't want to touch a terminal
If you run a small brand and you've ever stared at a blank Canva file at 11pm trying to ship one more ad creative for tomorrow, this guide is for you.
The Static Ad Generator is a framework that takes a brand name, a website URL, and a few product photos, and hands you back twenty production-ready static ad images in about an hour. No design tool. No copy block. No back-and-forth with a freelancer. You give Claude the brand info, approve a couple of permission prompts, and walk away while it works.
By the end of this article, you'll have:
- An Anthropic account with the Claude Code app installed and signed in
- A FAL.ai account with credits loaded and an API key set on your machine
- Python 3 installed and ready
- The Static Ad Framework downloaded, opened, and configured
- Your first brand folder set up with product photos
- A finished gallery of twenty ad images you can review, pick winners from, and ship
This is written for users who are new to AI tools, new to anything that runs in a terminal, and a little nervous about the words "API key." That's fine. We're going to walk through every single step, including the parts that other tutorials skip, like signing up for the right accounts and getting the right credentials before you ever try to run anything.
Quick orientation: The framework gives you two ways to run it. We'll spend most of this article on the easier path (the Claude Code Desktop App, no terminal needed). If you already use VS Code and want to use it instead, there's an appendix at the end with the alternate setup.
What this framework actually does
Before we touch any setup, here's the mental model. The framework runs in three phases, all driven by Claude.
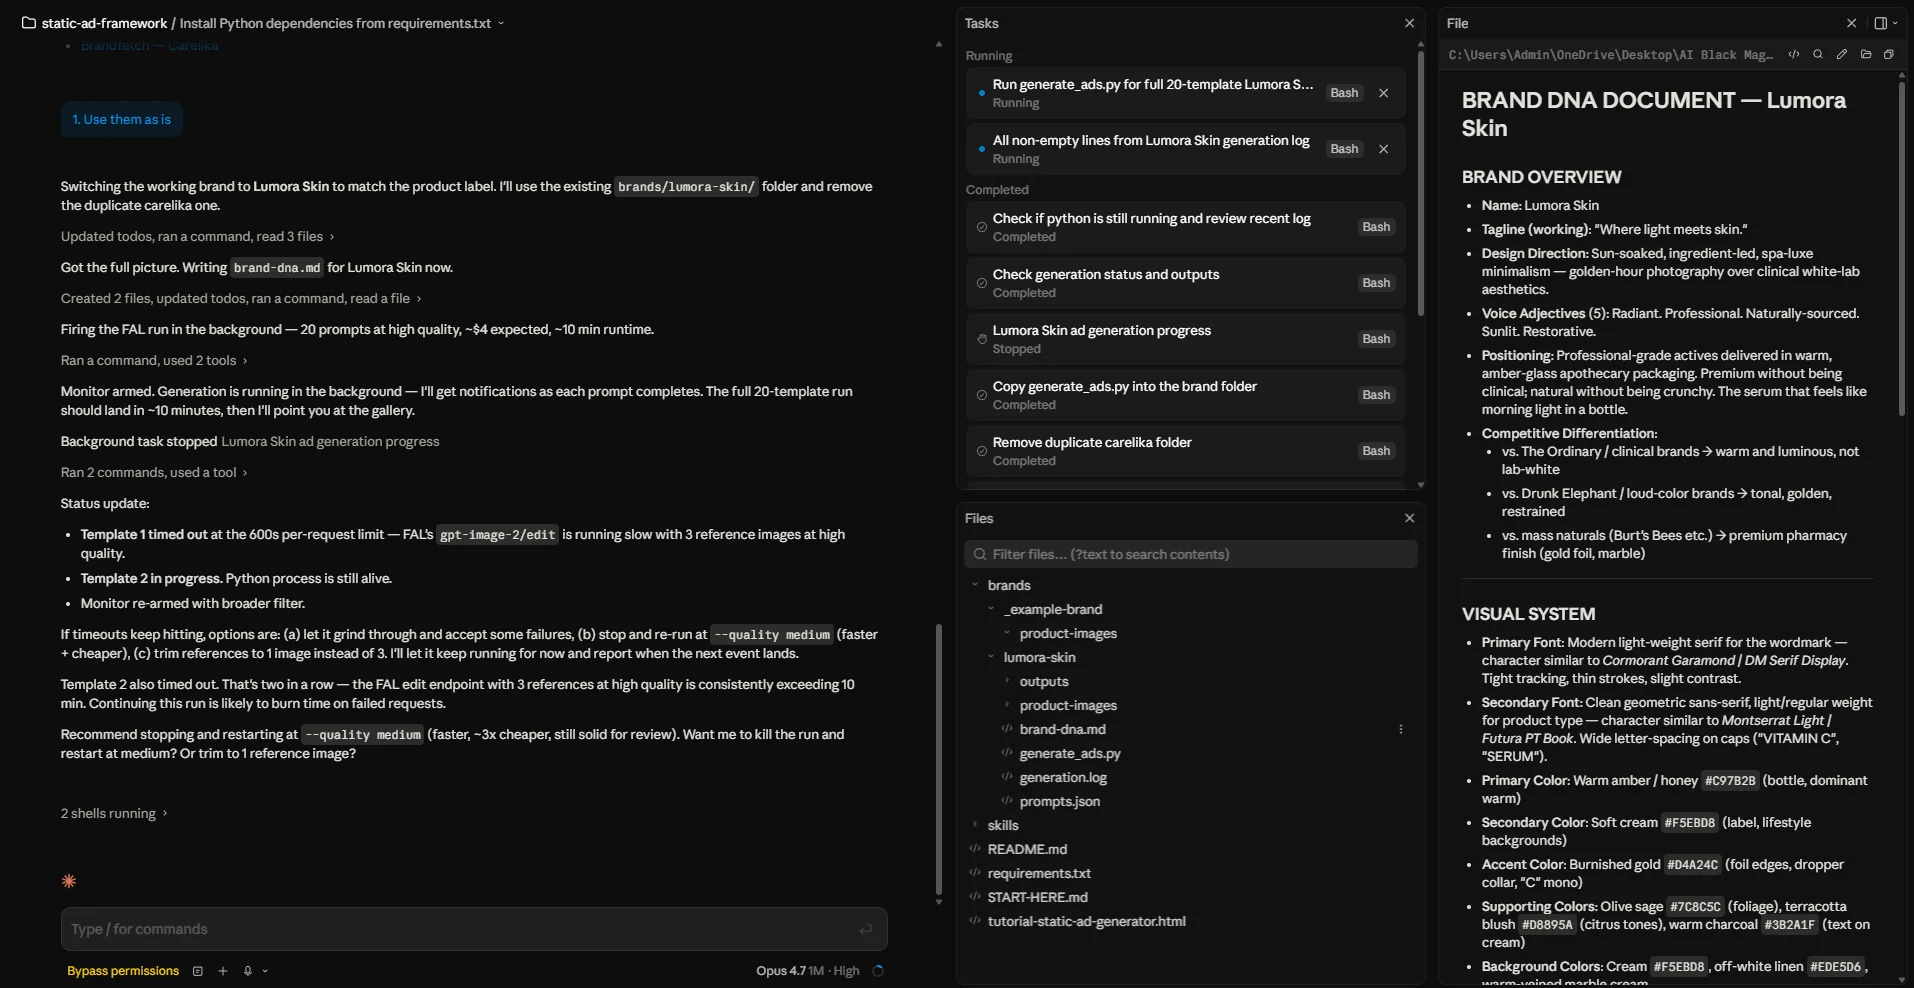
Phase 1: Brand Research. You give Claude your brand name and your website URL. Claude searches the web for everything it can find about your brand: fonts, colors, packaging, the look of your current ads on Meta, your founding story, your competitors. It writes all of that into a single document called brand-dna.md. This becomes the playbook for every ad it creates. Takes two to five minutes.
Phase 2: Prompt Generation. The framework ships with twenty proven static ad templates. Things like a headline ad, an offer callout, a stat callout, a before-and-after split, a customer review card, a side-by-side comparison. Claude reads your Brand DNA from Phase 1, then fills in every template with your brand's exact fonts, colors, headlines, and copy. It saves the result to a file called prompts.json. Takes about thirty seconds.
Phase 3: Image Generation. A small Python script reads prompts.json, sends each prompt to GPT-Image (the image model from OpenAI we'll use to actually render the ads), and saves the finished image files to a folder. Each image gets generated one at a time. The script also makes you an HTML gallery so you can scroll through all twenty ads in your browser. Takes thirty to sixty minutes depending on speed.
That's it. Three phases. You answer one prompt to start ("generate ads for [brand], URL is [url]"), and the framework does the rest.
Heads up on cost: The framework isn't free to run. GPT-Image charges per image, and a full 20-template run costs roughly $3 to $5 in real money. We'll cover budgeting in detail later, but go in knowing you'll be putting at least $10 of credit onto a service called FAL.ai before your first run. That $10 covers around 50 ads.
What you need before you touch anything
This is the part most tutorials skip and then beginners get stuck thirty minutes in. We're not going to skip it. There are six things you need lined up before you try to generate a single ad. Knock these out in order and you won't hit a wall later.
1. Anthropic account
So you can use Claude Code (the desktop app that runs the whole framework).
2. FAL.ai account + API key
FAL is the service that runs GPT-Image for us. You'll need credits and a key.
3. Python 3 installed
The image generation script is written in Python. You don't have to write any.
4. The framework files
The folder of files that contains the templates and the script.
5. Your product photos
One to three real photos of your product, in PNG, JPG, or WebP.
6. About an hour of focus
Setup takes 30 minutes. The first run takes another 30 to 60.
2.1 Sign up for Anthropic and install Claude Code
Anthropic is the company that makes Claude. The desktop app that drives this entire framework is called Claude Code, and it's a free download once you have an account.
- Go to claude.com/claude-code in your browser.
- Click the option to sign up if you don't have an account yet. You can sign in with Google, with Apple, or with an email address. Use whatever you'll remember.
- Once you're signed in, download the Claude Code Desktop App for your operating system. There's a Windows installer and a Mac installer.
- Run the installer the same way you'd install any normal app. On Windows, double-click the
.exefile and follow the prompts. On Mac, drag the Claude Code icon into your Applications folder. - Open Claude Code. The first time you launch it, it will ask you to sign in. Use the same Anthropic account you just made.
About plans and pricing: Claude has free and paid tiers. Claude Code works on the paid plans (Pro or Team). If you're going to run this framework regularly, you'll want at least the Pro plan. Check the current pricing on Anthropic's site at the time you sign up because it changes occasionally.
2.2 Sign up for FAL.ai
FAL is a service that hosts AI image models so people can use them through code. We're using FAL because it gives us access to GPT-Image, the image model the framework was built around. You'll need an account and you'll need to load it with a small amount of credits.
- Go to fal.ai in your browser.
- Click the sign-up button in the top right. You can sign up with Google or with an email and password. Either works.
- Verify your email if it asks you to.
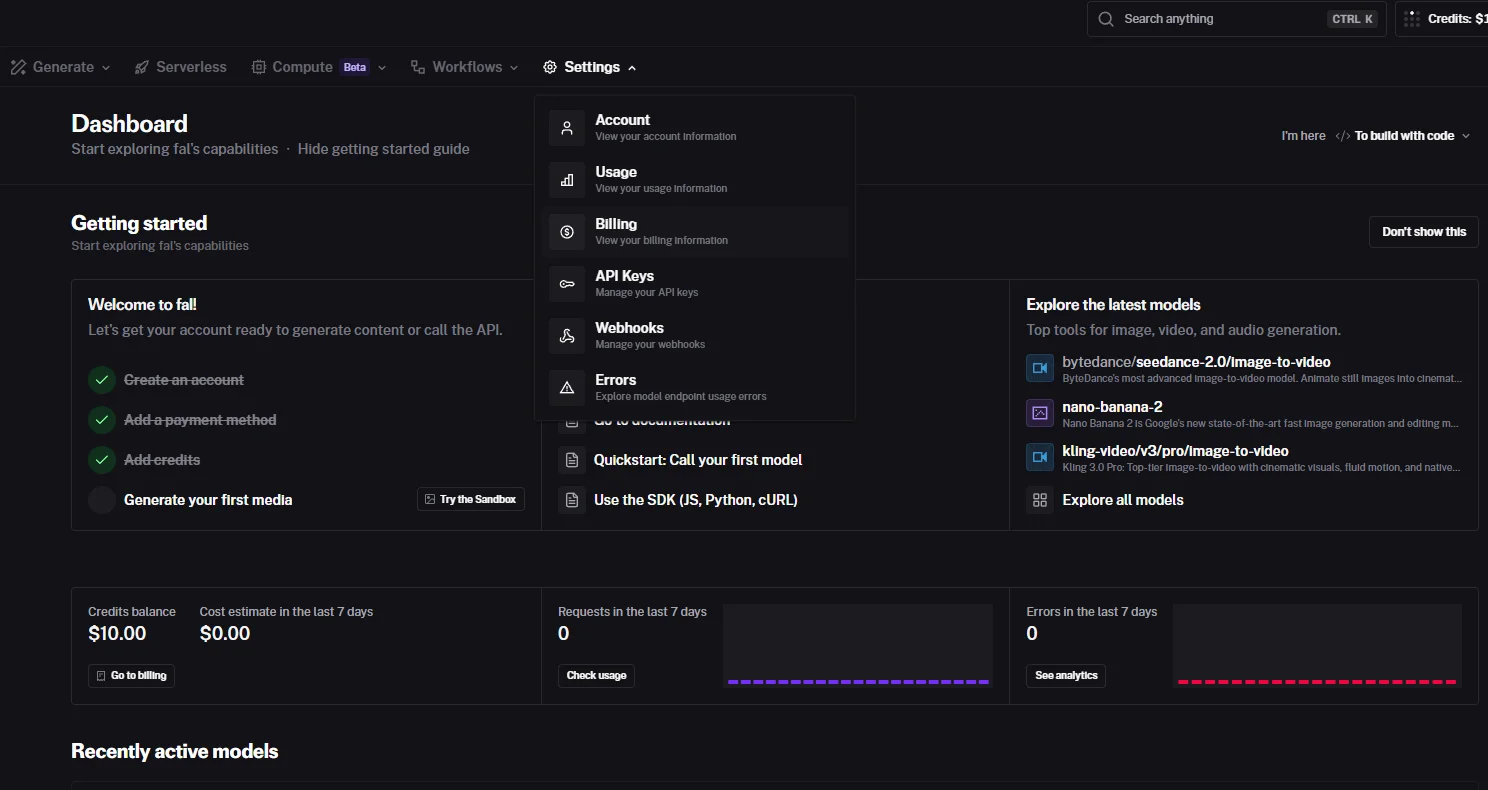
- Once you're signed in, you'll land on the FAL dashboard. Take a quick look around. The two pages we care about are "Keys" and "Billing." Both are reachable from the left sidebar or the top nav, depending on the layout when you visit.
2.3 Get your FAL API key
An API key is a long random string that proves you're you when your computer talks to FAL. Think of it like a password that only your scripts use. Anyone who has this string can spend your FAL credits, so you treat it like a password.
- From the FAL dashboard, go to fal.ai/dashboard/keys.
- Click the "Add key" button in the top right of the API Keys page.
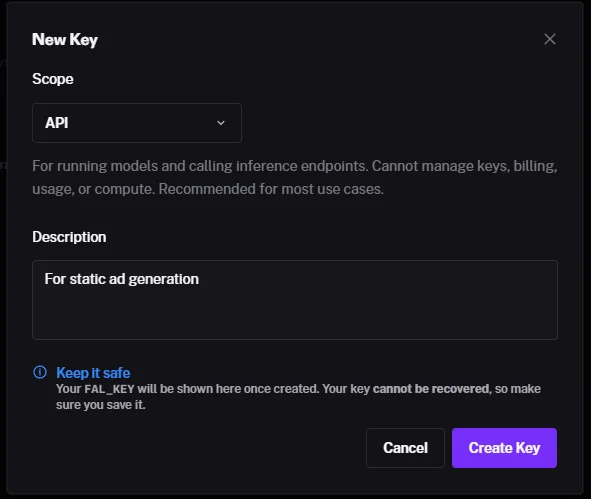
- A small dialog called "New Key" opens. It has two fields:
- Scope: leave this set to
API. That's the default and it's the right one for this framework. The "API" scope lets the key run models and call inference endpoints. It can't manage your billing, other keys, or your account, which is exactly what you want for a key that lives on your computer. - Description: type a name you'll recognize later, like
static-ad-framework. This is just for your own reference so you know which app the key belongs to if you create more later.
- Scope: leave this set to
- Click the purple "Create Key" button at the bottom of the dialog.
- FAL will now show you the key. It looks like
fal_xxxxxxxxxxxxxxxxxxxxxx. Copy the entire string immediately. Paste it into a notes app or a password manager so you don't lose it.
You only see the key once. FAL even warns you about this in the dialog: "Your FAL_KEY will be shown here once created. Your key cannot be recovered, so make sure you save it." If you close the window before saving the key, you can't get it back. You'd have to delete that key and create a new one. No big deal, but worth knowing.
Never share this key. Don't paste it in a Discord channel asking for help. Don't email it. Don't commit it to a public GitHub repo. If you think it's been exposed, go back to the keys page and revoke it, then create a new one. FAL will let you do that as many times as you need.
2.4 Top up your FAL credits
FAL is pay-as-you-go. You load credit, and image generation deducts from that balance.
- Go to fal.ai/dashboard/billing.
- Add a payment method. Credit card or debit card.
- Top up with $10 to start. That's enough for roughly 50 to 60 high-quality ads, which is two or three full 20-template runs with room to experiment.
Why $10 and not more: You'll want to do one or two test runs before committing to a bigger budget. The first run almost always reveals tweaks you want to make. Better to spend $5 figuring out what works for your brand, then load $50 and do real runs.
2.5 Install Python 3
Python is a programming language. You don't have to write any. The framework includes a small Python script that does the actual work of sending prompts to GPT-Image and saving the resulting images. The script is already written. You just need Python on your machine so it can run.
On Windows:
The newer Windows installer uses the Python Install Manager. The flow is a little different from older guides you might find online, but it's actually simpler. PATH is handled for you automatically. There's no checkbox to remember.
- Go to python.org/downloads.
- Click the big yellow button at the top of the page to download the latest Python 3 installer for Windows.
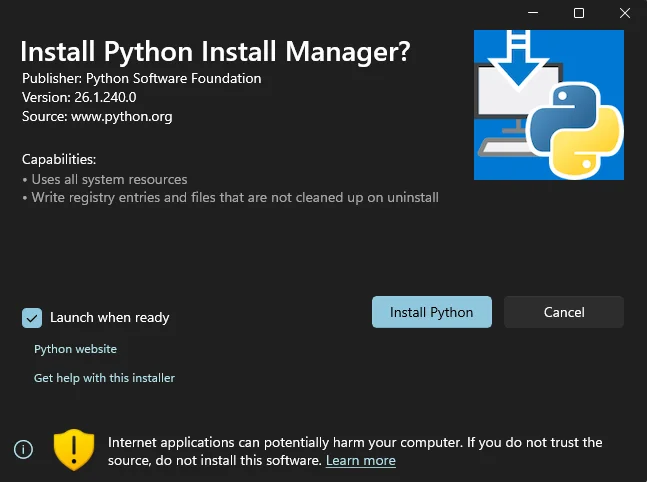
- Open the file you just downloaded. A Windows app installer dialog appears titled "Install Python Install Manager?". The publisher is "Python Software Foundation". This is the official installer.
- Leave "Launch when ready" checked at the bottom-left of the dialog, then click the blue "Install Python" button.
- Wait for it to finish. The dialog closes automatically when it's done.
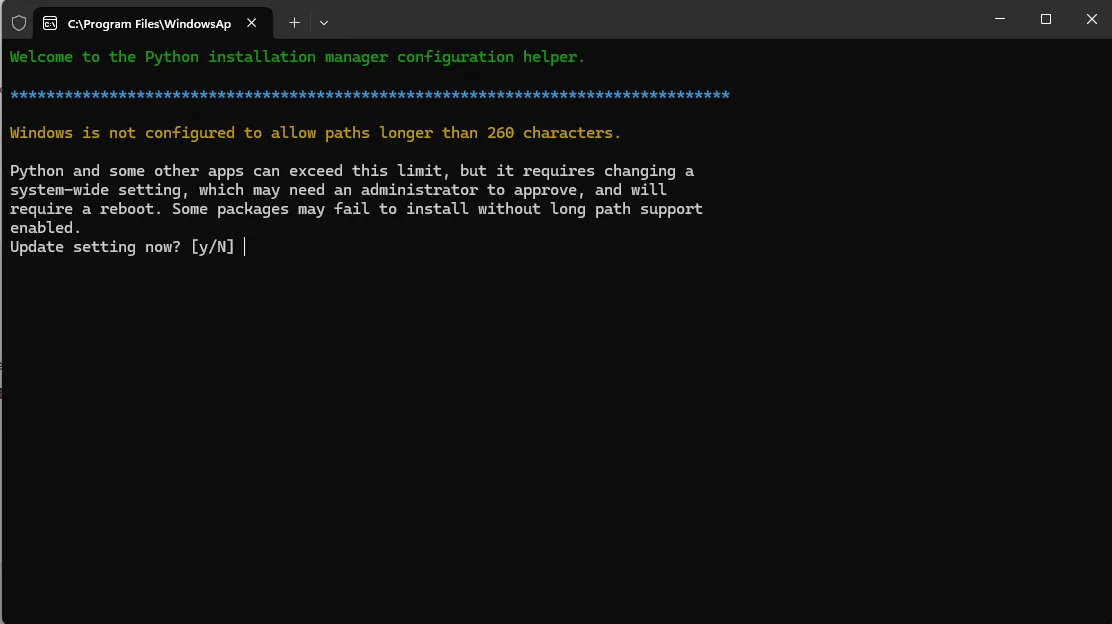
- A small terminal window pops up next, titled "Python installation manager configuration helper". It asks: "Windows is not configured to allow paths longer than 260 characters... Update setting now? [y/N]". Type
yand press Enter to enable long path support. You may see a Windows administrator prompt. Approve it. Your computer might prompt you to restart.
Why enable long path support? Windows has an old limit where file paths longer than 260 characters can break things. The framework saves images into nested folders like brands/lumora-skin/outputs/01-headline/, so enabling this prevents weird "file not found" errors later. If you'd rather skip the reboot for now, you can type N and the framework will still work in most cases. You can always turn it on later by re-running the configuration helper.
On Mac: Python 3 comes preinstalled on modern macOS. You probably don't need to do anything. If you want to confirm, open Terminal (Spotlight search "Terminal") and type python3 --version. If you see a version number, you're set.
On Linux: Python 3 is usually preinstalled. If not, install it with sudo apt install python3 python3-pip on Ubuntu or Debian.
2.6 Get the framework files onto your computer
The Static Ad Framework is a folder of files packaged as a zip archive (static-ad-framework.zip). You can download the zip file here:
Once the download finishes:
- Find the zip file in your Downloads folder.
- Right-click it and choose "Extract All" on Windows, or double-click it on Mac.
- Move the resulting folder somewhere you'll remember. We recommend:
- On Windows:
C:\Users\YourName\static-ad-framework - On Mac:
~/static-ad-framework(your home folder)
- On Windows:
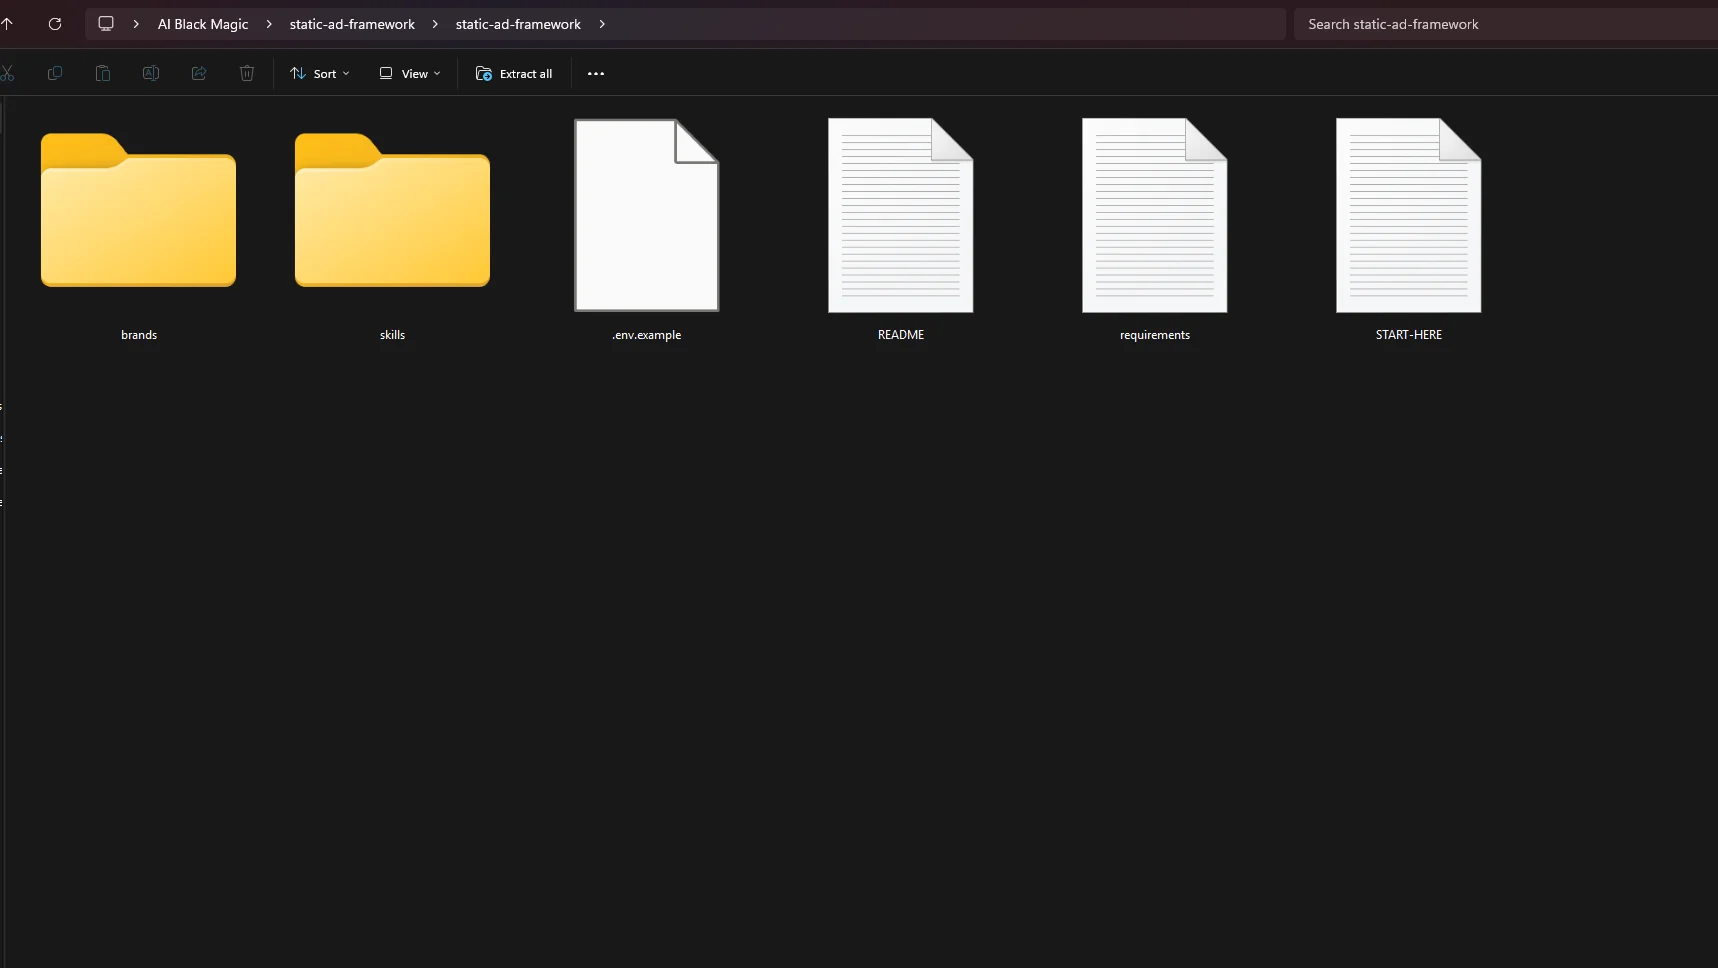
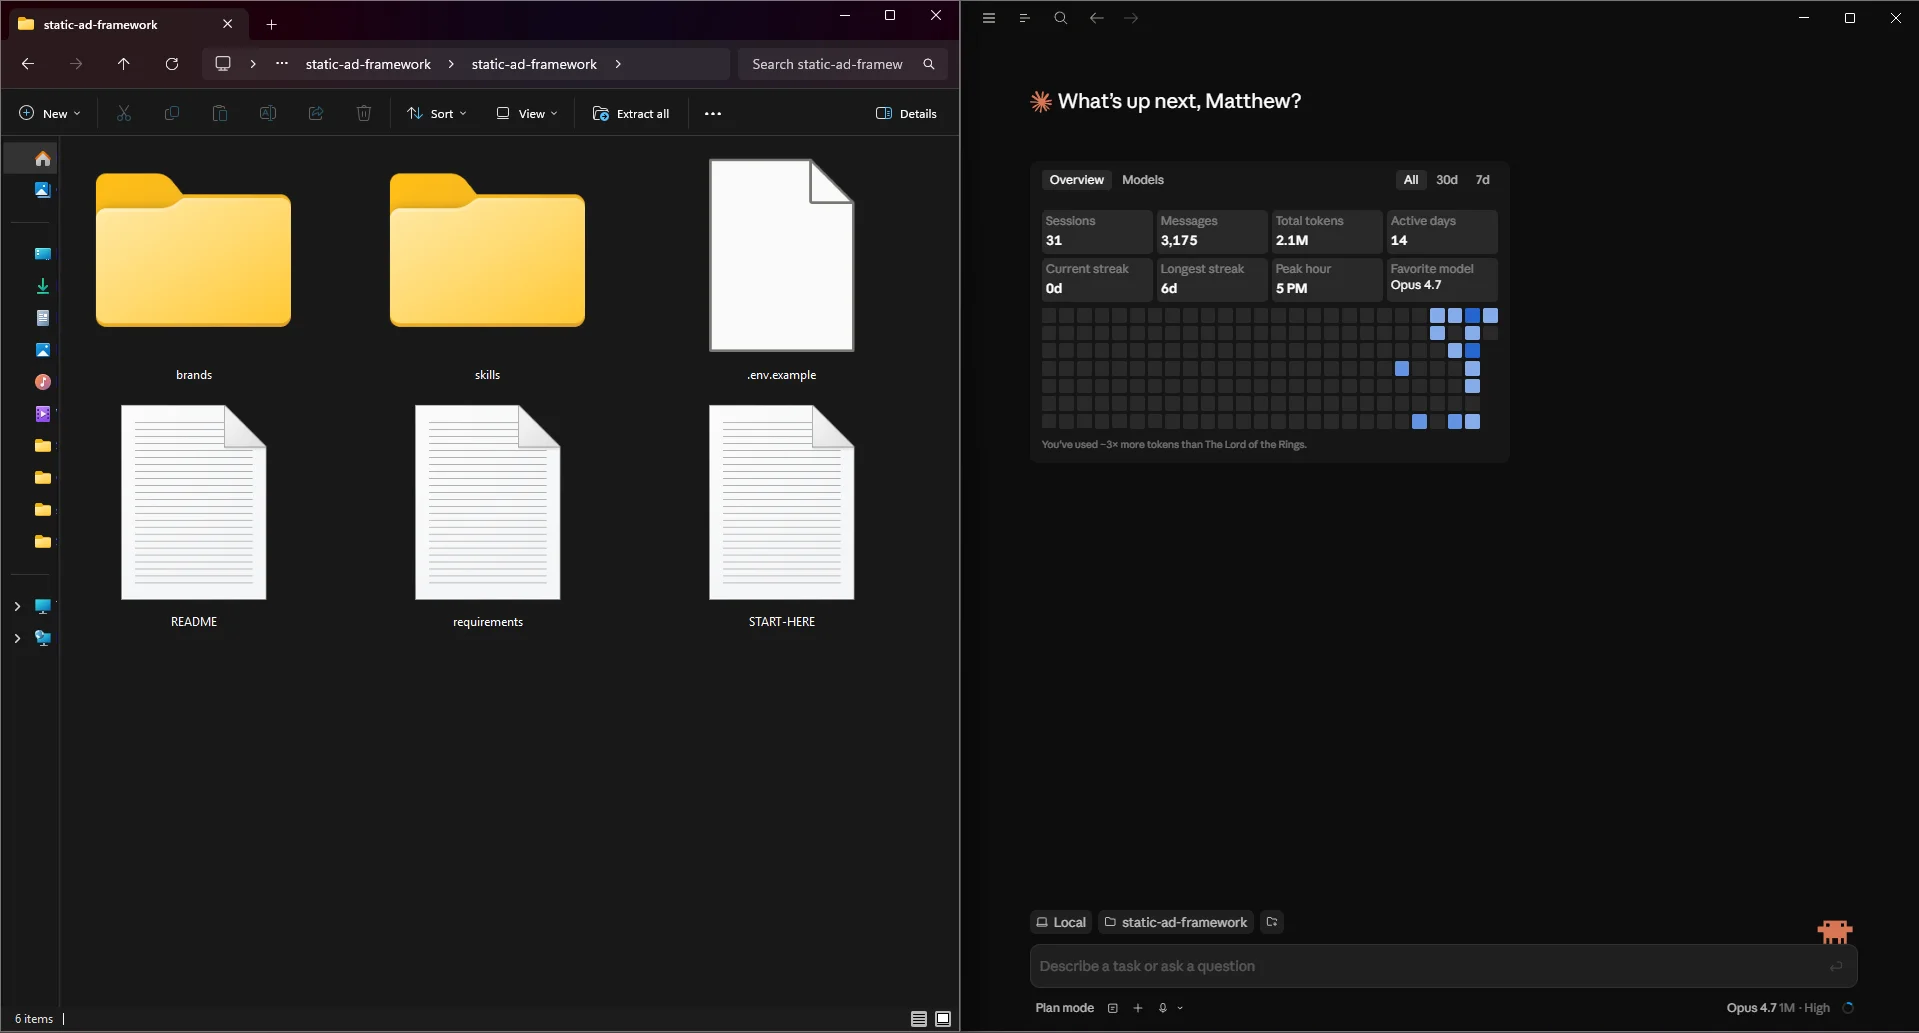
- Open the folder. You should see files including
START-HERE.md,README.md, askillsfolder, and abrandsfolder. Good. That means your unzip worked.
2.7 Get your product photos ready
This is the part that affects the quality of every ad you generate. The framework sends your real product photos to GPT-Image as a reference, so it can render the actual product (your packaging, your label, your colors) inside every ad. The better your input photos, the better your output ads.
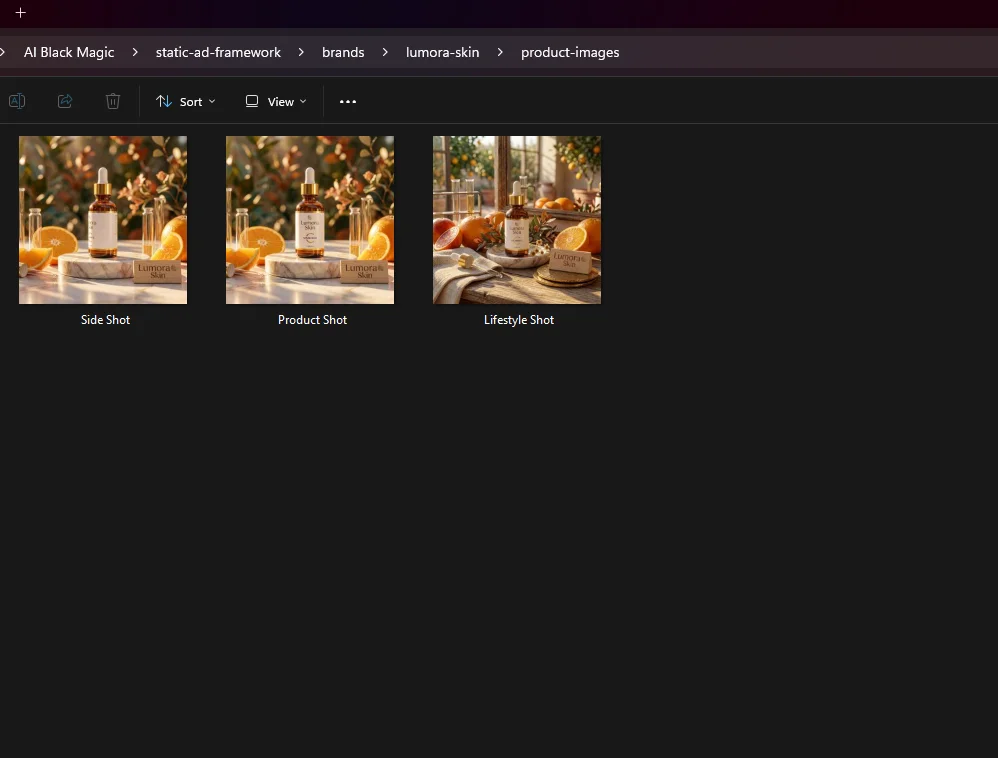
You want one to three photos of your product. Three is the sweet spot.
- Photo 1: front of packaging. Clear, well-lit, label visible, on a clean background.
- Photo 2: angled shot. Same product, three-quarter angle so the model gets a sense of depth and shape.
- Photo 3 (optional): lifestyle shot. The product in context. On a counter, in a hand, beside a coffee. Helps with lifestyle ad templates.
Format: PNG, JPG, or WebP. Don't worry about being a professional photographer. Decent phone photos in good light work fine. Avoid heavily filtered, blurry, or low-resolution images.
Pro tip: If your only product photo is a flat lay or studio shot from your e-commerce site, that's perfectly fine. The model can work with one image, it just gets stronger with two or three.
Setting up the framework in Claude Code
Everything you needed is now in place. We're going to open the framework folder inside Claude Code, install one Python dependency, set your FAL key permanently, and create your first brand folder. Take your time on this section. Each step takes a minute or two.
3.1 Open the framework folder in Claude Code
- Launch the Claude Code Desktop App.
- The first time you open it, or any time you start fresh, it'll ask you to choose a folder to work in. Pick the
static-ad-frameworkfolder you unzipped. - If Claude Code is already open in another folder, go to File → Open Folder (or your platform's equivalent) and choose
static-ad-framework. - Claude Code will load. It automatically reads the
skills/SKILL.mdfile inside the framework, which is the framework's instruction manual for Claude. You don't have to do anything to make Claude "learn" the framework. It's automatic.
3.2 Install the Python dependency
The image generation script needs one tiny Python library called requests. Instead of opening a terminal yourself, just ask Claude to do it.
In the Claude Code chat box, type exactly:
Press enter. Claude will explain what it's about to do, then ask for permission to run a shell command. Approve the permission prompt. Claude will run the install, and you'll see output confirming it worked. Wait until Claude says it's done before moving on.
About permission prompts: Claude Code asks before doing anything that touches your system (running scripts, installing packages, changing environment variables). This is good. Read what it's about to do, and if it makes sense, approve it. You can always say no.
3.3 Set your FAL API key on your computer
Now we tell your computer where to find your FAL key. We're setting it as something called an "environment variable," which is just a name-value pair your computer remembers. The Python script looks for one called FAL_KEY when it runs.
Open the notes app where you saved your fal_… key. Then in the Claude Code chat box, type:
Replace fal_xxxxxxxxxxxxx with your real key. Send the message. Claude will show you the exact command it's about to run (using setx on Windows, or updating ~/.zshrc on Mac). Approve the permission prompt.
Windows users, this part matters: After Claude finishes setting FAL_KEY with setx, you must completely quit Claude Code and reopen it. Windows only picks up new environment variables when an app restarts. Skip this step and the script won't see your key.
3.4 Create your first brand folder
Each brand you make ads for lives in its own folder under brands/. This is where Claude saves your Brand DNA, your generated prompts, and your finished ad images.
For this walkthrough, we're going to use a fictional brand called Lumora Skin, a small skincare company that sells a vitamin C serum. You can replace it with your real brand at any point. The steps are identical.
In the Claude Code chat box, type:
Approve the permission prompt. Claude creates the folders and confirms.
Now drop your product photos into brands/lumora-skin/product-images/ using your file manager (File Explorer on Windows, Finder on Mac). Suggested file names:
product-front.pngproduct-angle.pngproduct-lifestyle.png
The exact names don't matter. The script picks up whatever's in that folder.
Generating your first batch of ads
Setup is done. We're going to run the whole pipeline now. One message kicks off all three phases.
In the Claude Code chat box, type:
(Replace with your actual brand name and URL when you do this for real.)
Send. Now sit back. Here's what's going to happen, in order.
Phase 1: Brand Research (2 to 5 minutes)
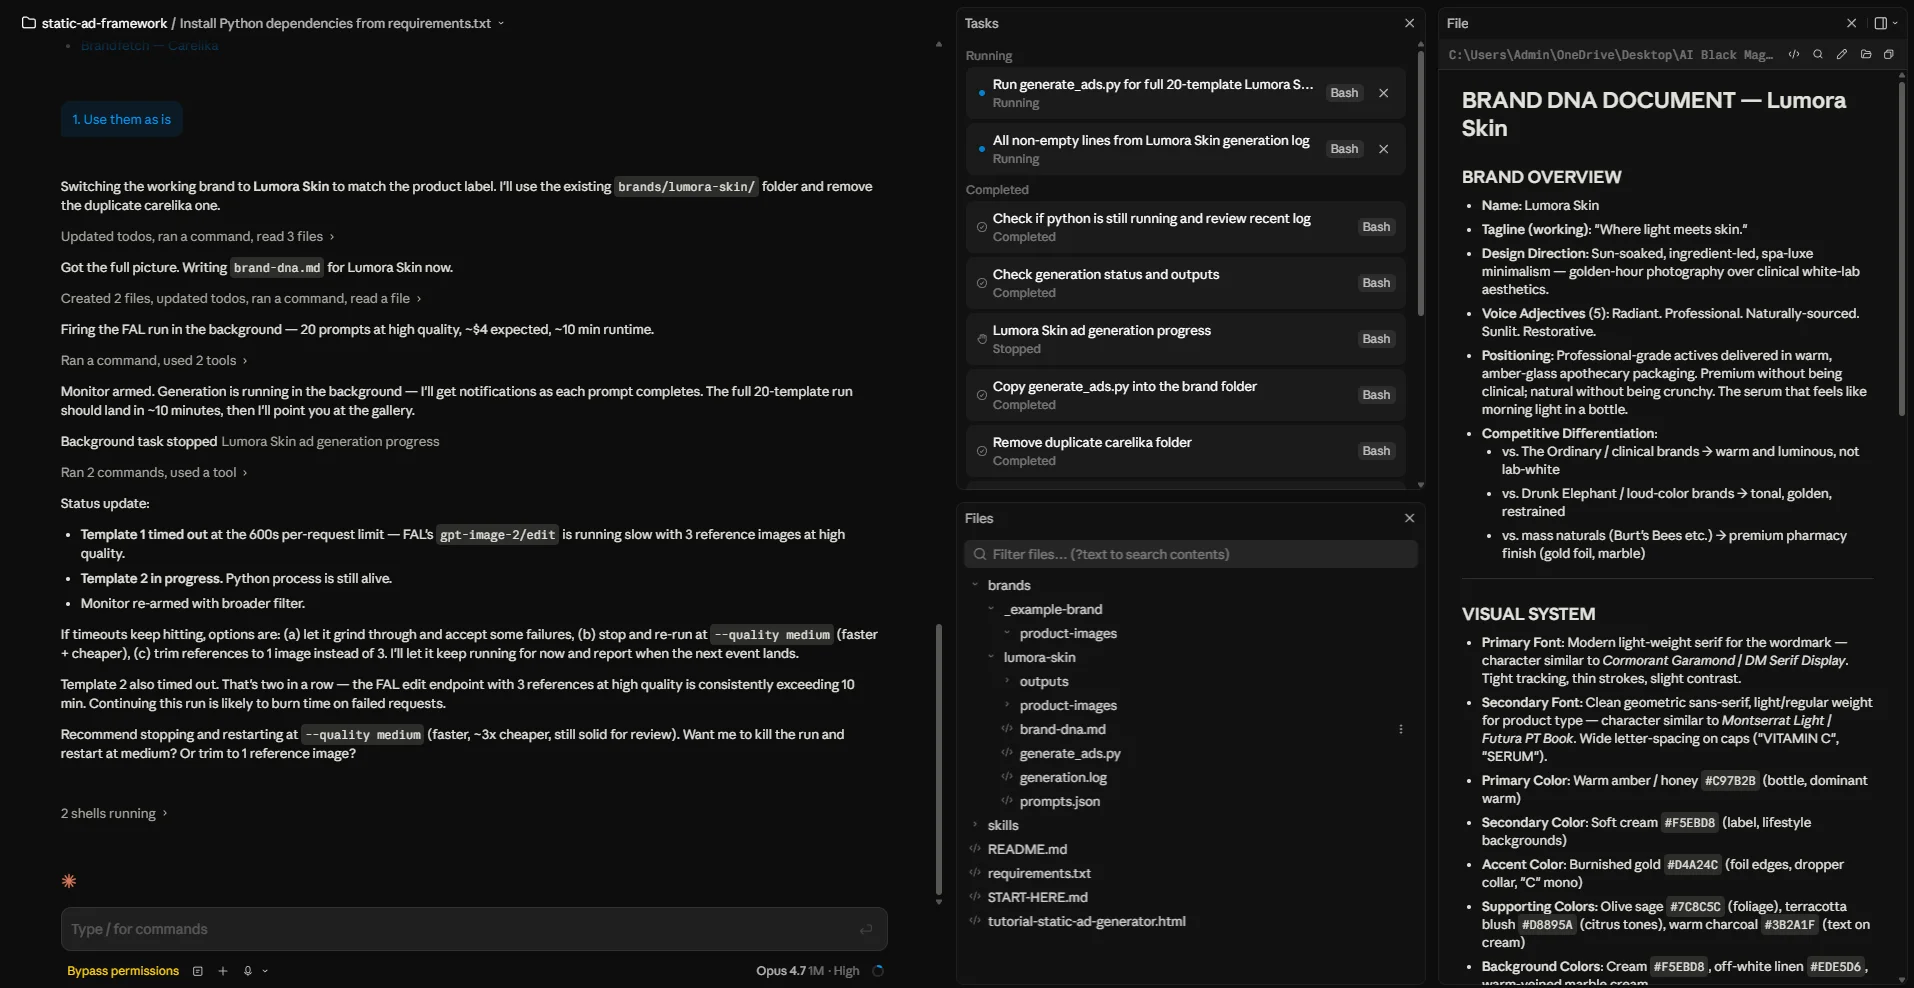
Claude starts searching the web for everything it can find about Lumora Skin. It looks at the website. It looks for the brand on the Meta Ad Library to see what current ads look like. It searches for the founding story, the design agency that built the brand, the color palette, the fonts, the packaging photos, who the competitors are.
You'll see Claude narrating each step in the chat. It might say things like "Searching for Lumora Skin brand colors" or "Reading the homepage to extract the voice and tone." This is normal. You don't have to do anything except watch.
When Phase 1 finishes, Claude saves a file called brand-dna.md into brands/lumora-skin/. Open it if you're curious. It's a structured document with sections like Brand Overview, Visual System, Photography Direction, Product Details, and Ad Creative Style. This is the playbook every ad will follow.
Phase 2: Prompt Generation (about 30 seconds)
Claude reads the Brand DNA, then walks through the twenty templates one by one and fills them in with your brand's specifics. Things like the brand's hex colors, the headline copy that fits its voice, the right product name, the right offer language. It saves the result to brands/lumora-skin/prompts.json.
If you open prompts.json, you'll see twenty entries, each with the full prompt that's about to be sent to GPT-Image. You can edit anything in this file before Phase 3 if you want to tweak copy or descriptions.
Phase 3: Image Generation (30 to 60 minutes)
Claude copies generate_ads.py from skills/references/ into the brand folder, then runs it. The script does the following:
- Reads
prompts.json - Uploads your product photos to FAL so the model can use them as reference
- For each of the twenty prompts, sends it to GPT-Image, waits for the response, and downloads the finished image into
outputs/01-headline/,outputs/02-offer-promotion/, and so on - Saves the prompt text alongside each image in a file called
prompt.txtso you can see what generated what - When all twenty are done, builds an
index.htmlgallery page
Claude will show you the script's progress live in the chat. If you see a permission prompt for running the script, approve it. If anything fails partway through, the script saves what it already generated, so you don't lose work.
This is the long part. Phase 3 takes 30 to 60 minutes for all twenty templates at high quality. You can leave the computer alone and come back. The script handles everything.
Reviewing your gallery and picking winners
When Phase 3 finishes, Claude will tell you it's done and point you to the gallery file. The gallery lives at brands/lumora-skin/outputs/index.html.
To open it:
- Open File Explorer (Windows) or Finder (Mac)
- Navigate to your
static-ad-frameworkfolder, thenbrands/lumora-skin/outputs/ - Double-click
index.html
It opens in your default browser. You'll see all twenty ads laid out in a grid, with the template name labeled under each one. Scroll through. Pick three to five favorites. Discard the rest.
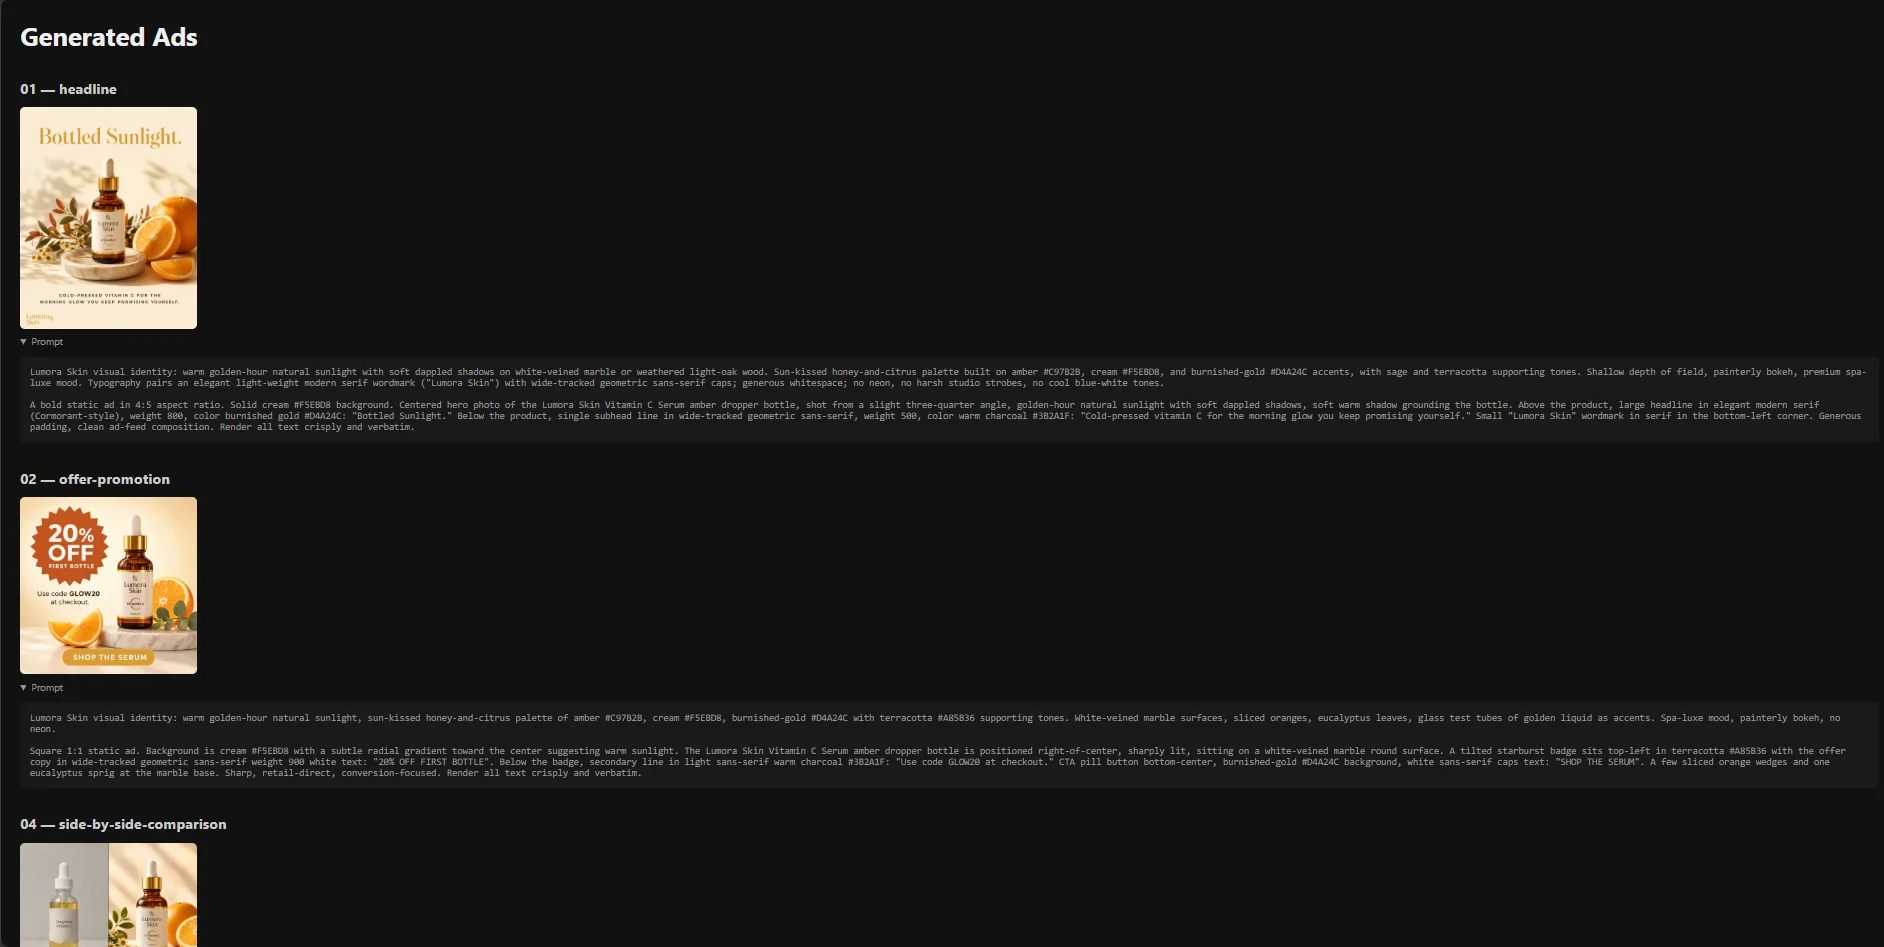
Each individual ad image lives inside its own template folder, like outputs/01-headline/headline_v1.png. To use one, just drag it out of the folder into wherever you upload ads (Meta Ads Manager, your email tool, your ecommerce platform).
Don't be surprised if not every ad is a winner. That's the point of generating twenty in one batch. Some will look great immediately, some will need small tweaks, and some you'll throw out. The math still favors you. A 30 percent hit rate on twenty ads gives you six usable creatives for $5. Good luck getting that from a freelancer.
Cost optimization and quality tiers
The framework runs on GPT-Image's "high" quality tier by default. That's what you want for the ads you actually ship. But during testing, you don't always need top quality. Here's how the math breaks down.
| Run type | Approximate cost | When to use |
|---|---|---|
| One ad at high quality | $0.15 to $0.25 | Final production ads |
| Full 20-template run, high quality | $3 to $5 | Real campaigns |
| Full 20-template run, medium quality | $1.50 to $2.50 | Iterating on new templates or testing copy variations |
To run cheaper while testing, ask Claude:
To regenerate just specific templates without rerunning all twenty:
Already-completed images aren't re-billed. The script checks what already exists and skips it.
Real talk on quality tiers: "Low" quality is cheap but text rendering breaks down badly. Avoid it for anything that has visible copy in the ad, which is most templates. "Medium" is fine for testing layouts. "High" is what you ship.
Troubleshooting common problems
If your first run hits a snag, it's almost certainly one of these. Most fixes are 30 seconds.
"FAL_KEY not set" or auth errors
Your key isn't set, or it's set wrong. To check, ask Claude:
If it comes back blank or doesn't start with fal_, set it again from Section 3.3. On Windows, remember to fully quit and reopen Claude Code after using setx.
"python: command not found" or "pip: command not found"
On Windows, this usually means the Python Install Manager finished but the configuration helper got closed before PATH was set. Re-run the installer from python.org/downloads. When the configuration helper terminal opens, let it finish (type y at the long-path prompt and approve the admin prompt). If you're still stuck, restart your computer so the PATH change takes effect, then close and reopen Claude Code. On Mac and Linux, try python3 and pip3 instead of python and pip.
Claude says it can't find the skill
Your project root in Claude Code is set to a parent folder, not to the framework folder itself. Use File → Open Folder and pick static-ad-framework directly. The skills/ folder must be at the top level of what Claude Code sees.
Phase 3 fails partway through
The script saves images as it goes. Re-run with only the templates that didn't finish. For example, if templates 1 through 12 saved but 13 onward didn't:
Generated ads don't look like your product
Add more product reference photos. The model anchors better with two or three angles than with one. A front shot plus a three-quarter angle plus a lifestyle shot covers most use cases.
Generated text is misspelled or garbled
Make sure you're running at "high" quality, not medium or low. Fine text rendering breaks down at lower tiers. Also, the framework wraps every headline in straight double quotes inside the prompt because that pattern produces the most reliable text output. If you've been editing prompts manually, don't strip the quotes.
FAL says "out of credits"
Top up at fal.ai/dashboard/billing. Add another $10 or more.
Going further: custom templates and reusing brand DNA
Once you've shipped a couple of brands through the framework, two patterns will save you a lot of time.
Add your own ad templates
The twenty templates that ship with the framework are a starting point. They're not sacred. Every time you spot a winning ad on Meta that you'd like to copy the structure of, write a new template and add it to skills/references/template-prompts.md.
Templates use bracketed placeholders like [BRAND_NAME], [PRIMARY_COLOR], [HEADLINE], [PRODUCT_NAME], that Claude fills in during Phase 2 from your Brand DNA. Look at the existing twenty templates to see the pattern, then write your own. Save. Next run uses them.
Your template library is the long-term value here. Anyone can call an image API. A curated collection of ad formats that consistently work is what makes this framework valuable to your business.
Reuse Brand DNA for new products in the same brand
Once you've run Phase 1 for a brand, you have a brand-dna.md file. You don't have to regenerate it for new products in the same brand. Just tell Claude:
Claude reuses the existing Brand DNA, regenerates prompts for the new product, and runs image generation. Cuts your per-launch time roughly in half.
Mining real customer reviews for ad copy that actually converts
Here's the upgrade that takes your ads from good to genuinely high-performing. The auto-generated copy from Phase 2 is functional. It sounds like decent ad copy. But it's also generic. The ads that convert best on Meta are the ones that quote real customers, in their actual words.
The workflow is simple:
- Pull customer reviews from your product page, your Amazon listing, your Trustpilot page, or wherever your reviews live. A tool called Apify is the easiest way to scrape reviews from most sites without writing any code. Search for the relevant Apify "actor" for the platform you need (Amazon Reviews Scraper, Trustpilot Reviews Scraper, etc.) and follow the actor's instructions.
- Save the reviews as a
.txtor.csvfile inside your brand folder. - Before running Phase 3, ask Claude:
Inject real customer languageRead the reviews in customer-reviews.txt and update prompts.json so review-style templates use real customer quotes instead of generic copy. Keep the quotes verbatim.
- Run Phase 3.
GPT-Image renders quoted text verbatim, which is the whole reason we wrap headline copy in straight double quotes throughout the framework. So when a real customer writes "I literally feel my skin glowing within a week," that exact sentence ends up rendered cleanly inside your ad. That's a different level of authenticity than any AI-written copy.
Why this works: Customers don't write the way marketers write. They use weird specific phrases, contractions, and small details that read as real because they are real. Stealing their language is the cheapest, highest-impact upgrade you can make to your ad copy.
The repeatable process from here on
Once you've done one brand, every brand after it gets faster. Here's the entire workflow for new brands going forward, in three lines:
- Create a folder under
brands/. - Drop one to three product photos into
product-images/. - Send Claude the message:
Generate ads for [brand], URL is [url].
That's the whole loop. Twenty ads for around five dollars and an hour of compute. If you're running multiple brands, or shipping new product launches every month, this scales. The setup work you just did is one-time. The brand work is repeatable.
Alternative setup: using VS Code instead of Claude Code Desktop
If you already use VS Code (Microsoft's code editor) for other work, or you'd rather have an integrated terminal in the same window as your files, this path is for you. The end result is identical to Path A. The only difference is which app you're in.
A.1 Install VS Code and the Claude Code extension
- Download VS Code from code.visualstudio.com.
- Install it like a normal app.
- Open VS Code, click the Extensions icon in the left sidebar (or press
Ctrl+Shift+Xon Windows orCmd+Shift+Xon Mac), search for "Claude Code" by Anthropic, and click Install. - Sign in with your Anthropic account when prompted.
A.2 Open the framework folder
Go to File → Open Folder and pick the static-ad-framework folder you unzipped earlier.
A.3 Open the integrated terminal
Go to View → Terminal, or press the backtick key while holding Ctrl on Windows or Cmd on Mac. A terminal panel opens at the bottom of VS Code. It's already inside the framework folder.
A.4 Install the Python dependency
In the terminal, run:
On Mac or Linux:
On Windows:
A.5 Set your FAL key
On Mac or Linux, for the current terminal session only:
To make it permanent, add that exact line to ~/.zshrc (Mac) or ~/.bashrc (Linux). Restart the terminal so it picks up the change.
On Windows PowerShell, for permanent storage:
Then quit and reopen VS Code so the new variable is picked up.
To verify it worked, run echo $FAL_KEY on Mac or Linux, or echo $env:FAL_KEY on Windows. You should see your key printed.
A.6 Open the Claude Code panel and continue
Click the Claude Code icon in the VS Code sidebar to open the chat panel. From here, the steps are identical to Section 3.4 onward. Create your brand folder, drop in product photos, and ask Claude to generate ads.
If you prefer to run the Python script directly from the terminal instead of asking Claude, you can. Once Phase 1 and Phase 2 have created prompts.json:
Swapping the image model: GPT-Image to Nano Banana Pro
The framework defaults to GPT-Image because it renders quoted text verbatim better than any other model right now, and that's critical for ad copy. But there's an alternative on FAL called Nano Banana Pro (Google's image model) that has different strengths. It's better at photorealism and character consistency. It's weaker at clean text rendering. For lifestyle or editorial templates without much copy, you might prefer it.
To swap the image model, edit skills/references/generate_ads.py:
- Change the endpoint from
https://fal.run/openai/gpt-image-2tohttps://fal.run/fal-ai/nano-banana. - Change the edit endpoint from
https://fal.run/openai/gpt-image-2/edittohttps://fal.run/fal-ai/nano-banana/edit. - Update the request payload. Nano Banana takes
aspect_ratioas a string ("1:1", "4:5") instead of animage_sizedictionary. It also doesn't have the low/medium/high quality tier system.
Run a few templates after the swap before kicking off a full batch. The two models render text differently, so you'll want to confirm your headline copy still reads cleanly.
If you're not comfortable editing Python: Ask Claude to do the swap for you. Just say "Switch generate_ads.py to use Nano Banana instead of GPT-Image, and tell me what you changed." Claude will edit the file and explain the diff so you can review it before running.
You're done. What now?
You just set up an end-to-end ad creative pipeline. Most agencies charge thousands of dollars to deliver what you can now produce in an hour for the cost of a coffee.
The first run is the hardest. You'll spend most of the time on accounts, installs, and getting your head around the workflow. After that, every brand is just three steps and a coffee break while Claude works.
If you take one thing from this article, take this: the framework's value isn't the twenty templates. It's the loop. Brand research, prompt generation, image generation, gallery, repeat. The templates can be replaced. Your library will grow over time as you spot winning ad formats on Meta and add them. The customer reviews you mine for copy will become more specific to your brand. The Brand DNA gets sharper each time you re-run it.
Run it on your own brand first. Ship the ads. See what converts. Then start adding your own templates. That's the long game.
Next step: Once you've run your first batch, write down the three templates that worked best for your audience. Those become the core of your library. Every new template you add later either matches that energy or gets cut.